Art Machines

What are Art Machines?

Build, move, and create — 
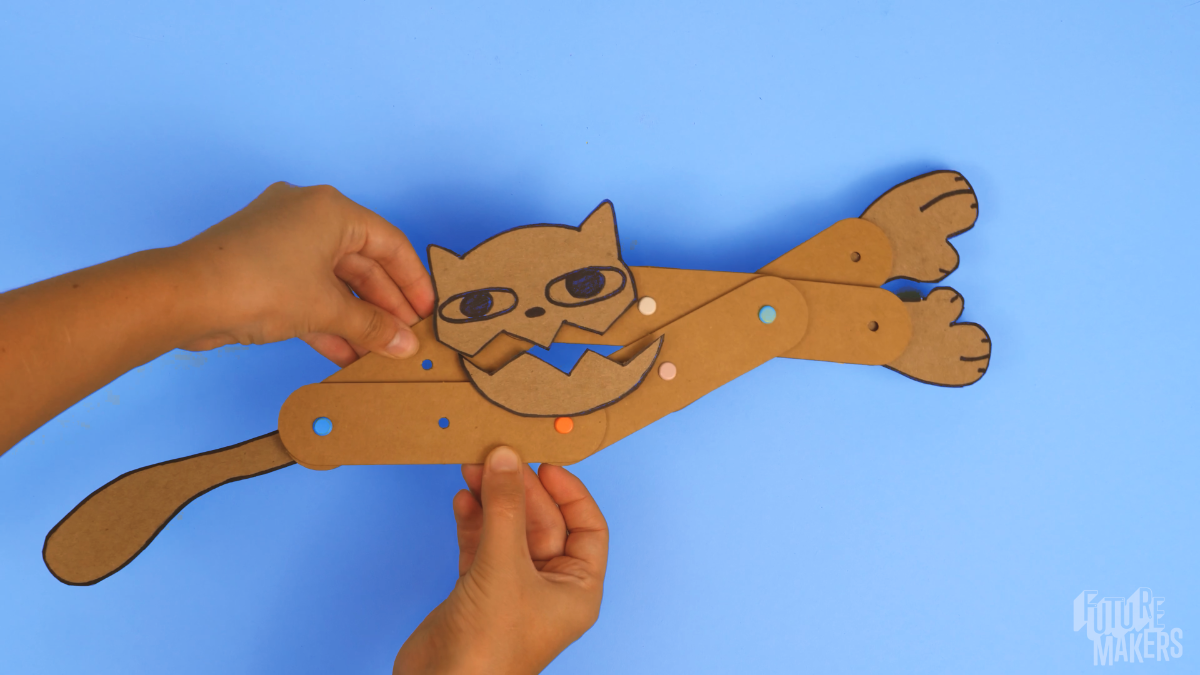
Art Machines are kinetic sculptures that are designed and built to move!  They use systems of connected levers and fulcra to come alive. Learners assemble compound machines that extend and retract in unison, then redesign them into unique creatures and inventions. This Spark weaves character creation, engineering, and artistic design into one hands-on challenge where every Art Machine can tell a story.

Time Needed:
Classroom: 30-45 minutes. Event: 10-15 minute station activity.
Grade Level:
PK and up

Overview

Art Machines are kinetc sculptures that are designed and built to move and come to life. By assembling levers and fulcra with a custom designed feature, learners explore movement, character development and artistic expression — an engaging entry point to engineering concepts with room for creativity at every step.

Learners follow a core build, then redesign, experiment, and iterate to create a unique solution to a design challenge. Because this is a STEAM challenge, each learner's finished project should look uniquely their own.

Materials

Each learner recieves
  • A board with die-cut components
  • A package of fulcra (fasteners)
  • A cardboard rectangle for creating faces or features
  • A set of sticky strips for easy attachment
  • An instruction sheet
  • A reusable, reclosable bag
What you need to provide

Scissors

Drawing materials

Creature Feature design sheets for classroom programs (link below)

Optional resources
  • Tape, scrap cardboard, craft paper, and other classroom art supplies for extensions
  • Extra cardboard or heavy paper for redesign iterations

Key Challenges

  1. Can you build a compound machine from simple parts?Learners assemble levers and fulcra into a connected system, recognizing how individual components work together to create motion and stability.
  2. How does it move as a system? Learners explore how pairs of levers, connected together,  influence how the whole Art Machine moves.
  3. Where are we using the engineering design process? Learners ask / imagine / plan / create / improve at every stage.
  4. How can I make mine unique? Learners use a design sheet to sketch an original feature, different from the example provided.

Learner Goals

MUST
  • Create a system of six connected levers and fulcra.
  • Identify the simple machines (lever and fulcra) and explain how they create a compound machine when they work together.
SHOULD
  • Create a unique solution to the challenge of designing a mouth, claw, or other "creature feature."
COULD
  • Collaborate with other learners to create shared stories using their art machines.
  • Work together in a relay game, handing objects to one another using their art machines as extensions of their bodies.

Extension Activities

  • Arts Integration: Transform your Art Machine to create unique characters — anatomical features of different animals and insects (mouths, beaks, claws, wings, tails), or characters from a story you love.
  • Hidden Feature: What is hiding behind those features? Design a secret reveal — is it a tongue, teeth, or another creature lurking inside?
  • Storytelling: Create a short story about your Art Machine’s adventures. What is your Art Machine’s name? What does its voice sound like? Where does it live? Introduce your character to a neighbor and build a story with a main character, a setting, and three events.
  • Double Features: Try redesigning the machine so it can be moved from the middle, with features on both ends — like hands that clap or wings that flap!
  • Machine Design: How can you use your Art Machine to tackle a practical engineering challenge, like picking up objects with a modified claw?
  • Claw Machine Relay: Design hands or claws that pick up and hold! Work in pairs to pass a small object using only your Art Machines.

Before You Start

Watch Our Educator Guide!
Pre-Activity Questions
Pre-K - Kindergarten
  1. What makes this a machine?
  2. What shapes do you see in the pieces? How do they work together?
1st - 3rd Grade
  1. What makes this a machine? 
  2. Can you identify the levers?  What about the fulcra?
  3. How do you think the levers and fulcra will work together?
Pro Tips
  • The project will go home with them. When you start, tell them that their Art Machine will belong to them when they’re done
  • Make an example and keep it simple. Add any feature you want to your model machine, but keep it simple so your learners can be more creative than you.
  • Let creativity lead. Encourage learners to add extra elements like arms, tails, or any feature they imagine — the more personal, the better.
  • Coach before you fix. When a learner is struggling, resist the urge to step in. Point out what you see and ask what they think might be causing the challenge.
  • Mobilize peer experts. Invite learners who have solved a step support others — peer support builds confidence and creativity.
  • Avoid getting hands-on. Only fix a project yourself if it’s truly necessary. Letting learners work through challenges builds ownership and persistence.
  • Prep extra cardboard in advance. Cut a few spare rectangles before class. Learners who need a second try on their feature design will stay engaged instead of waiting for materials.

Step-by-Step Guide

Step 1: Prep parts and the guide

Question: What do you notice about the different pieces in your kit? How do you think they will work together?

  • Remove all levers from the board
  • Find your fulcra (fasteners)
  • Identify the assembly steps in the printed guide, if you're using them.

Step 2: Make Three "X" Shapes

Question: How can we connect the pieces so they can move?

  • Connect two levers using a fulcrum (fastener) to form an “X” shape. The fasteners might be new to your learners - refer to the how-to images in the slide deck and the key on the printed guide.
  • Repeat this process to create three connected “X” shapes.
  • Ask learners how they think changing the placement of the fulcrum might affect movement.

Step 3: Connect Your "X's"

Question: How does movement transfer from one set of levers to the whole system?

  • Align the three lever sets, connecting them at the top and bottom using additional fulcra.
  • Encourage learners to add one set at a time and test as they go.

Step 4: Design a Creature Feature

Question: How can we make our Art Machine unique? The example has a face — what will theirs look like?

  • Draw a face on the provided cardboard rectangle. It’s essential to have a design that allows the cardboard to be separated into two pieces — a top and a bottom.
  • If this is a classroom project, use the Creature Feature Design Sheet to help learners plan before they draw and cut.
  • Draw the mouth all the way across so it’s easy to create two separate parts, then cut a slit for the mouth to create a moving effect.

Step 5: Attach the Feature

Question: How do we attach our feature to the machine so it moves?

  • Flip your design over so the back is facing upward and "closed".
  • Extend the levers and lay them over the back of the feature.
  • Attach the top lever to the top part with a sticky strip — you can tear and use small pieces if you want. Press firmly to make them hold tight.
  • Attach the bottom to the other lever. Now test it!
  • Just in case, have some extra cardboard scraps or heavy paper handy for those who might need another try.

Step 6: Iterate!

Question: Now that your Art Machine is working, what could you change to make it do something completely different?

  • Challenge learners to remove their feature and create something new — a claw, wings, a hidden surprise, or something nobody has thought of yet.
  • What happens if you move the machine from the middle instead of the ends?
  • Can two Art Machines work together to pass an object from one to another?
  • Learners can re-use their levers and fulcra — provide additional cardboard or heavy paper for new designs.
  • See Extension Activities for more structured challenges across grade levels.
Post-Activity Questions
Pre-K - Kindergarten
  1. What makes this a machine?  Name some of the parts.
  2. How did the parts work together? 
1st - 3rd Grade
  1. What's the difference between a simple machine and a compound machine? 
  2. Name the parts of your machine - what are they??
  3. If you were to teach another learner how to create this, what suggestion would make?

Standards & Goals

Common Core ELA Standards

RI.K-2.7 – Use illustrations and words in a text to describe key ideas: Example: Learners refer to visual guides and instructional diagrams to build their Art Machines, identifying how each part contributes to the final design.

SL.K-2.1 – Participate in collaborative conversations: Example: Learners discuss their design choices with peers, describe challenges they encounter, and work together to solve problems.

RI.3.7 – Interpret information from diagrams and text: Example: Learners analyze instructional diagrams in the build guide to correctly assemble their Art Machine, then describe the function of each part.

W.3-5.2 – Write informative/explanatory texts: Example: Learners document their design process, explaining why they placed the fulcrum in a certain location and how different lever lengths affected motion.

Common Core Math Standards

K.MD.A.1 – Describe measurable attributes of objects: Example: Learners compare the locations of the fulcra and discuss how moving them could affect balance and movement.

K.G.A.1 – Describe objects using names of shapes and their relative positions: Example: Learners describe the X-shape of connected levers and identify the position of the fulcrum relative to the lever ends during assembly.

3.MD.B.4 – Measure and estimate lengths: Example: Learners measure the length of levers and record how small adjustments impact movement efficiency.

4.MD.A.2 – Use measurement to solve problems involving distances: Example: Learners measure distances between fulcrum placements and solve for optimal lever arm lengths to maximize range of motion.

Next Generation Science Standards (NGSS)

K-PS2-1 – Motion and Stability: Forces and Interactions: Example: Learners explore how pushing and pulling their Art Machines affects movement. When they move the fulcrum closer or farther from the center, they observe how forces change the motion of their machine.

K-2-ETS1-2 – Engineering Design: Example: Learners follow the design process by asking questions, imagining solutions, planning their builds, and iterating to improve their "feature function".

3-PS2-4 – Defining and Delimiting Engineering Problems: Example: Learners identify a specific challenge (e.g., making their Art Machine pick up an object) and design an iteration that successfully moves an object from one place to another.

3-5-ETS1-3 – Planning and Carrying Out Investigations: Example: Learners systematically test different fulcrum placements to see how they affect the motion of their Art Machine, documenting their findings and adjusting their builds accordingly.

Troubleshooting & Pro Tips

Levers Come Apart

Lay the machine flat. Press firmly on each fulcrum so it squeezes tight. Try it again and see if it made a difference.

Face Is Loose

Reinforce with additional sticky strips, or reposition components for better balance. Ask learners: where can we add more adhesive? Encourage them to press firmly to make sure it sticks. If they’ve used all their strips, regular tape works just as well.

Mouth Doesn’t Open Wide

Remove the face, extend the machine as long as it stretches, then attach with the mouth closed.

Feature Is Floppy

Adjust it! Ask the learner where they can add more adhesive, and encourage them to press firmly to make sure everything is secure.

Machine Isn’t Moving

Its parts might be stuck together. Check that the top and bottom sections aren't connected wth sticky strips ibefore trying again.

Book a quick support session via Calendly
Book here