Blendies

What are Blendies?

Explore symmetry, balance, and optical color mixing with a reconfigurable spinning top! Learners assemble wooden parts on a square dowel, test symmetrical and asymmetrical builds to see which spins better, then color primary-colored peanuts and watch their brain optically blend them into secondary colors as the Blendie spins. This Spark weaves motor-skill development, engineering, and art into three linked explorations where every learner takes home a unique spinning creation.

Time Needed:
20 minutes as a quick-build activity station, or 60 minutes as a three-part classroom exploration (spin, symmetry, color blending).
Grade Level:
Pre-K and up
View our slides!
More resources
Need more materials?
Click Here
Navigate to
Jump to a section

Overview

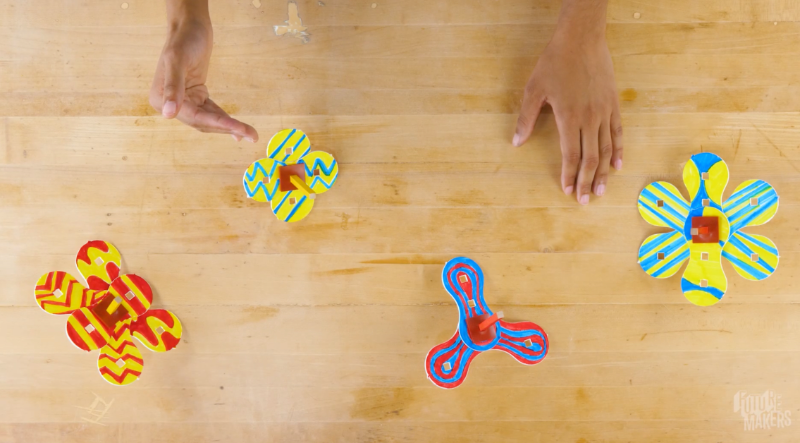
Blendies introduce learners to balance, symmetry, and optical color mixing — the phenomenon where spinning primary colors blur together into a new secondary color faster than the eye can separate them. Each learner receives two rubber stoppers, one square dowel, and one board of wooden Blendie pieces (called “peanuts” and “wings” for their two- and three-lobed shapes). Learners share primary-colored markers (red, yellow, blue) from a set that serves a small group.

The activity unfolds in nine steps across three linked phases. Phase one is the core build: remove pieces from the board, slide a stopper onto the dowel, add two peanuts in a crisscross flower shape, cap with the second stopper, and practice spinning with one-hand and two-hand techniques. Phase two explores symmetry: swap in wings to build a symmetrical blendie, then add a second wing on a side hole to make it asymmetrical, and observe how each one spins. Phase three is color blending: color the front of each peanut a different primary, rebuild the blendie color-side-up, and spin fast enough that the eye can’t separate the two colors — the brain fills in a new secondary color. Extensions invite older learners to draw two-color patterns on both sides of their pieces for more advanced optical blends.

Materials

Each learner recieves
  • Two rubber stoppers
  • One square wooden dowel
  • One Blendie board with punch-out pieces — two “peanut” shapes (two lobes) and wings (three lobes)
  • Primary-colored markers — red, yellow, and blue — shared from a set
What you need to provide

A smooth spinning surface — a flat tabletop or floor area where learners can test their Blendies without obstructions.

Optional resources
  • Printable Blendie builds choice board for guiding symmetry and advanced pattern challenges
  • Blendies extensions resource for educators (linked on the slide deck’s resources slide)
  • Plastic bags or labeled bins for storing each learner’s parts between sessions
  • Name labels or slips of paper so learners can identify their own kits
  • Extra Grades 3+ Patterns choice board for advanced pattern design

Key Challenges

  1. Assemble a spinning top from wooden pieces and a dowel. Learners break pieces out of the board, slide a stopper onto the dowel, add peanuts in a crisscross flower shape, and press a second stopper down firmly to sandwich everything tight.
  2. Master two spinning techniques. Learners practice a one-hand twist-and-flick and a two-hand wrap-and-push, building fine motor skills and control over spin speed.
  3. Test symmetry and balance. Learners build a symmetrical blendie, then an asymmetrical version, and compare how each one spins — discovering that balanced shapes spin smoother and longer than unbalanced ones.
  4. Optically blend primary colors. Learners color the front of each peanut a different primary color, rebuild the blendie, and spin it fast enough that their brain blurs the motion and mixes the two colors into a new secondary color.

Learner Goals

MUST
  • Assemble a working Blendie by threading two peanuts and two stoppers onto the square dowel in the correct order.
  • Press the top stopper down firmly to sandwich the parts together so nothing comes loose during spinning.
  • Demonstrate at least one spinning technique (one-hand or two-hand) that keeps the Blendie spinning on a flat surface.
  • Identify peanuts, wings, stoppers, and the dowel by name.
SHOULD
  • Build both a symmetrical and an asymmetrical Blendie and describe the difference in how each one spins.
  • Explain that symmetry means the shape is the same on both sides of an imaginary center line.
  • Color the front of both peanuts with two different primary colors without mixing them on the same piece.
  • Spin a colored Blendie and describe the new secondary color they see when it blurs.
COULD
  • Notice that a star has symmetry at multiple angles (radial symmetry) and compare it to shapes with only one line of symmetry (bilateral).
  • Design a two-color pattern on the back of each peanut to create a more complex optical blend.
  • Use the Grades 3+ Patterns choice board to try advanced pattern designs that shift what the eye sees at different spin speeds.
  • Predict which color combinations will blend into orange, green, or purple before spinning to test.

Extension Activities

  • Symmetry Challenges: Use the “biggest symmetrical” and “smallest symmetrical” challenges from the slide deck — build the largest Blendie you can that is still symmetrical, then rebuild it using the fewest pieces possible while keeping it symmetrical. Compare how each one spins.
  • Pattern Blending: Flip your peanuts and wings over and draw a pattern using only two colors on the back side. Don’t overlap the colors on the same piece — let the Blendie do the mixing for you while it spins. See how different stroke patterns (stripes, dots, zig-zags) change the blended result.
  • Advanced Pattern Choice Board (Grades 3+): Use the Grades 3+ Patterns choice board to try pre-designed advanced patterns. Discuss with a partner: why does one pattern produce a smooth blend and another produces a flicker?
  • Spin-Speed Observation: Spin a colored Blendie slowly and watch the two primary colors stay separate. Spin it fast and watch the secondary color appear. Discuss: what does this tell you about how your eyes and brain work together to see motion?
  • Radial vs Bilateral Symmetry Hunt: Look around the room for shapes that are bilaterally symmetrical (like your body or a heart) and shapes with radial symmetry (like a star, flower, or snowflake). Which type does a spinning Blendie need?

Step-by-Step Guide

Pre-Activity Questions
Pre-K - Kindergarten
  1. What happens when you spin something really fast? Can you still see what it looks like?
  2. What are your favorite colors? Do you know how to make new colors by mixing them?
  3. Can you show me something in this room that is the same on both sides?
1st - 3rd Grade
  1. What does the word “symmetry” mean? Can you point to something symmetrical?
  2. What are the three primary colors? What color do you get if you mix red and yellow?
  3. Why do you think some spinning tops spin for a long time and others wobble and stop quickly?
4th - 8th Grade
  1. What’s the difference between bilateral symmetry and radial symmetry? Can you name an example of each?
  2. How do your eyes and brain work together when you look at something moving too fast to see clearly?
  3. If you made a Blendie with an unbalanced weight on one side, how would that change the way it spins, and why?
Pro Tips
  • Sandwich it tight. When you press the top stopper down, press firmly to sandwich all the parts together — loose parts come apart in the middle of a spin and kill the fun. This is the single most common build problem to watch for.
  • Markers come out last. Pull the primary-colored markers out of the kit before learners see them and keep them aside until the color-blending phase. Young learners will try to use them in the first two activities and cover their pieces before they’re ready.
  • Identify kits before you start. Because every learner has identical materials, put each learner’s pieces in a labeled plastic bag or bin with their name on a slip of paper. This matters most if you’re running the activity across multiple sessions.
  • Move to the floor to spin. Standard desks and small tabletops get in the way of a good spin. Move learners to the floor or a large clear surface for the spinning activities — they’ll get more reps and better observations.
  • Twist pieces out of the board. The punch-out pieces come free much more easily if learners twist them first instead of pulling straight out. Model this once before handing boards to the group.
  • Offer both spin techniques. The one-hand flick works well for older learners, but younger makers with developing fine motor skills do much better with the two-hand wrap-and-push. Show both and let each learner pick the one that works for them.
  • Color only the front. Remind learners to color only the front of each peanut, not the back. If they want to try a pattern, flip the piece and use the back as a second design — but never color both sides the same way.
  • Don’t mix colors on the same piece. The Blendie does the blending for you — if learners overlap two marker colors on the same peanut, the blend muddies. Each peanut gets one primary color; the spin does the rest.
  • Use a center-line check for symmetry. Hold up the symmetrical blendie and ask learners to imagine a line straight down the middle. Is the shape the same on both sides? This simple test works for every symmetry question learners will ask.
  • Extend to radial symmetry for older learners. For grades 3–5 and up, point out that a star has symmetry at multiple angles — that’s called radial symmetry. Ask if a spinning Blendie needs bilateral or radial symmetry to spin smoothly.

Step 1: Explore Your Materials

Question: What do you notice about the different pieces in your kit? Which ones look the same and which ones look different?

  • Have learners open their kit and lay out all components: two rubber stoppers, one square wooden dowel, one Blendie board with punch-out pieces, and the shared set of primary-colored markers (red, yellow, blue).
  • Introduce the vocabulary: the two-lobe pieces are peanuts, the three-lobe pieces are wings, the dowel is the thing they’ll spin on, and the stoppers hold everything in place.
  • Set the markers aside for now — you will not need them until the color-blending phase.
  • Show learners how to twist a piece before pulling it out of the board; twisting first makes the pieces release much more cleanly than yanking straight out.
  • Remove the middle squares from each stopper so the stoppers are ready to thread onto the dowel.

Step 2: Add Your First Stopper

Question: How far down the dowel should the first stopper go so there’s room for the rest of the pieces?

  • Take one of the stoppers and thread the dowel through its square center hole.
  • Slide the stopper about halfway down the dowel — you need room above it for two peanuts and the second stopper.
  • Test that the stopper grips the dowel firmly. If it spins freely, press it on a little more firmly; a loose stopper means a loose build later.
  • Remind learners that the square dowel only fits through the square hole on the stopper — the shape is a match.

Step 3: Add Two Peanuts and the Second Stopper

Question: What shape do the two peanuts make when you arrange them so they cross each other on the dowel?

  • Take two peanuts and slide them onto the dowel through their center holes, stacking them crisscross so they form a four-lobed flower shape from above.
  • Take the second stopper and slide it onto the dowel on top of the two peanuts.
  • Press the top stopper down firmly to sandwich all the parts tightly together. This is the single most important step for a Blendie that holds together during spinning — loose parts come apart mid-spin.
  • Check the build: if you shake the Blendie gently, no pieces should wiggle or slide. If they do, press the stopper down harder.

Step 4: Practice Spinning

Question: Which of the two spinning techniques works best for you — the one-hand flick or the two-hand push?

  • Move learners to a smooth, flat spinning surface. Standard desks and small tabletops get in the way; the floor or a large clear surface gives the best spins.
  • One-hand technique: Hold the Blendie on the surface, pinch the dowel between thumb, index, and middle finger, and flick those fingers in a clockwise motion — then let go as the Blendie spins away.
  • Two-hand technique: Position the Blendie on the surface, wrap both hands around the dowel, and quickly move your hands in opposite directions until the Blendie breaks free and spins. This technique is easier for younger learners developing fine motor skills.
  • Encourage learners to try both techniques and experiment with different spinning speeds — the more reps, the better their control becomes.
  • Celebrate the first successful spin; it builds confidence for the symmetry and color challenges that follow.

Step 5: Build a Symmetrical Blendie

Question: If you imagine a line running straight down the middle of your Blendie, is the shape the same on both sides?

  • Start fresh: slide a stopper halfway down the dowel, then add one peanut through its side hole and one wing centered on top of it through its center hole.
  • Cap with the second stopper and press everything tight.
  • Check for symmetry: hold the Blendie up and imagine a line straight down the middle. The shape on the left should match the shape on the right.
  • Spin it! A symmetrical Blendie should spin smoothly and stay upright for longer than an asymmetrical one. Prompt learners to observe how it spins and keep note of it for comparison in the next step.
  • Older learners can also notice that shapes like a star have multiple lines of symmetry — that’s called radial symmetry. The Blendies you’re building use bilateral symmetry (one line).

Step 6: Build an Asymmetrical Blendie

Question: What do you think will happen when you make your Blendie not the same on both sides?

  • Take the top stopper off your symmetrical Blendie.
  • Add a second wing to the dowel, but this time use one of its side holes instead of the center hole. This throws the balance off to one side of the dowel.
  • Put the top stopper back on and press everything tight.
  • Check for symmetry with the imagined center-line test — the shape on one side should clearly not match the other side. That’s asymmetry.
  • Spin it and compare to Step 5. Ask learners: Does it spin faster or slower? Longer or shorter? Does it wobble? How do they think symmetry affects balance?

Step 7: Color Your Peanuts

Question: Which two primary colors will you choose? What secondary color do you think will appear when you spin them together?

  • Take two peanuts out of the kit and grab the primary-colored markers (red, yellow, blue).
  • Pick one color and fully fill in the front of the first peanut.
  • Pick a different color and fully fill in the front of the second peanut.
  • Do not color the backs. Do not mix two colors on the same peanut — the Blendie will do the blending for you when it spins.
  • Encourage learners to predict: red + yellow = ? yellow + blue = ? red + blue = ? Let them guess before spinning.

Step 8: Build and Spin to Blend

Question: What new color appears when your Blendie spins fast enough that you can’t see the two primary colors separately?

  • Rebuild a simple Blendie: first stopper halfway down the dowel, then both colored peanuts stacked crisscross with the colored sides facing up, then the second stopper.
  • Press the top stopper firmly to sandwich all parts tight.
  • Spin it fast! When the Blendie spins fast enough, your eyes can’t track the two colors separately. Your brain blurs the motion and mixes them into a new secondary color.
  • Expected blends: red + yellow → orange, yellow + blue → green, red + blue → purple.
  • Slow the spin down — the secondary color fades and you can see the two primary colors again. That’s optical color mixing in action.

Step 9: Iterate!

Question: What other patterns or color combinations could you try to change what you see when your Blendie spins?

  • This is the creative phase — every Blendie can be made unique with new piece arrangements, color combinations, and patterns.
  • Try flipping your peanuts and wings over to draw a two-color pattern on the back side. Different stroke patterns (stripes, dots, zig-zags) produce different blends.
  • Swap in different piece combinations (wings vs peanuts, side holes vs center holes) and test how each new build spins.
  • Older learners can use the Grades 3+ Patterns choice board to try more advanced designs.
  • See the Extension Activities field below for structured symmetry challenges, pattern-blending challenges, the Grades 3+ choice board, spin-speed observation experiments, and a radial-vs-bilateral symmetry hunt.
Post-Activity Questions
Pre-K - Kindergarten
  1. Which way of spinning worked best for you — one hand or two hands?
  2. When you spun your Blendie with two colors, what new color did you see?
1st - 3rd Grade
  1. When you built a symmetrical Blendie and an asymmetrical one, which spun better? Why do you think that is?
  2. Which two primary colors did you use? What secondary color appeared when you spun it fast?
  3. What happens to the colors when you slow the Blendie down — can you still see the blend?
4th - 8th Grade
  1. Why does your brain see a new color when the Blendie spins fast, but sees two separate colors when it spins slowly? What does this tell you about how vision works?
  2. How did symmetry affect the length and smoothness of the spin? Connect it to what you know about balanced and unbalanced forces.
  3. If you redesigned the Blendie with pieces that weren’t the same size, how would you predict its spin would change?

Standards & Goals

Common Core ELA Standards

RI.K-2.7 – Use illustrations and words in a text to describe key ideas: Example: Learners follow the instructional playing cards and slide deck illustrations step-by-step to identify the peanut, wing, stopper, and dowel by name, matching picture diagrams to the physical pieces in their kit before assembling them into a working Blendie.

SL.K-2.1 – Participate in collaborative conversations: Example: Learners take turns describing what happens when they spin their symmetrical and asymmetrical Blendies, using shared vocabulary like “symmetrical,” “wobble,” and “spin” to compare observations with a partner and predict which color combination will blend into orange, green, or purple.

RI.3-5.3 – Explain relationships between ideas in a text: Example: Learners explain the cause-and-effect relationship between symmetry and spin quality by tracing how a balanced build on the dowel leads to smooth rotation while an off-center wing creates wobble — connecting the written build instructions and slide diagrams to the physical result they observe on the spinning surface.

SL.3-5.4 – Report on a topic with descriptive details: Example: Learners present their symmetry experiment results to a partner or small group, describing how the symmetrical Blendie spun, how the asymmetrical one wobbled, and which two primary colors they chose to blend — using descriptive language to explain exactly what their eyes saw at slow versus fast spin speeds.

RST.6-8.3 – Follow a multistep procedure when carrying out experiments: Example: Learners follow the nine-step Blendies build sequence precisely, understanding that the order matters — the first stopper has to be halfway down the dowel before the peanuts are added, and the top stopper must be pressed firmly at the end — because skipping or reversing steps produces a loose build that falls apart mid-spin.

SL.6-8.1 – Engage in collaborative discussions to analyze ideas: Example: Learners debate why the Blendie produces a different secondary color at different spin speeds, bringing their own observations to a group discussion of how human vision processes motion — building scientific argumentation skills by connecting what they see to the concept of optical blending.

Common Core Math Standards

K.G.A.4 – Analyze and compare two- and three-dimensional shapes: Example: Learners identify and compare the peanut (two-lobe) and wing (three-lobe) shapes in their kit, describing their similarities and differences and using positional language to arrange them symmetrically on the dowel — placing pieces “across from” and “on top of” each other to make the same shape on both sides of an imagined center line.

1.G.A.3 – Partition shapes into equal shares: Example: Learners imagine a line straight down the middle of their Blendie to check for symmetry, partitioning the whole shape into two halves and checking whether the left half matches the right half — reinforcing the concept of equal shares and the everyday vocabulary of “half” and “same on both sides.”

4.G.A.3 – Recognize a line of symmetry for a two-dimensional figure: Example: Learners identify lines of symmetry on their Blendie builds, testing whether a given arrangement of peanuts and wings can be folded along a line so that matching parts align — then comparing builds with one line of symmetry to a shape like a star that has multiple lines (radial symmetry), directly observing how the type of symmetry affects how the Blendie spins.

3.MD.B.4 – Generate measurement data and create a line plot: Example: Learners time how long their symmetrical and asymmetrical Blendies spin across several trials, recording the spin duration for each build, then plotting the data to compare average spin times and draw a conclusion about how symmetry affects the length of a spin.

8.G.A.3 – Describe the effect of transformations on two-dimensional figures: Example: Learners analyze their Blendie builds as rotational transformations, recognizing that a symmetrical build maps onto itself under a 180-degree rotation around the dowel while an asymmetrical build does not — connecting the mathematical concept of rotational symmetry to the physical reason the symmetrical Blendie spins smoothly and the asymmetrical one wobbles.

6.SP.B.5 – Summarize numerical data sets in relation to their context: Example: Learners collect spin-duration data across multiple symmetrical and asymmetrical Blendie trials, calculate the mean spin time for each build type, describe the variability between trials, and draw a data-backed conclusion about how symmetry affects rotational motion — practicing statistical summary in the context of their own physical experiment.

Next Generation Science Standards (NGSS)

K-PS2-1 – Motion and Stability: Forces and Interactions: Example: Learners compare how a symmetrical Blendie spins versus an asymmetrical one, feeling how a gentle flick or two-hand push produces a smooth spin on a balanced build and a wobbling, quickly-stopping spin on an unbalanced build — observing firsthand that the same push can change an object’s motion in different ways depending on its shape.

K-2-ETS1-2 – Engineering Design: Develop a simple sketch, drawing, or physical model: Example: Learners plan and test a symmetrical Blendie before building an asymmetrical one, using the imagined center line as a simple mental model of symmetry and iterating their piece arrangement until the shape is the same on both sides — then predicting how the spin will change when the symmetry is broken.

3-PS2-1 – Forces and Interactions: Balanced and Unbalanced Forces: Example: Learners plan and conduct an investigation on how balance affects a spinning Blendie, comparing symmetrical and asymmetrical builds and providing evidence that balanced mass allows smooth rotation while an off-center weight creates an unbalanced force that causes wobble and an early stop.

4-PS3-1 – Energy: Speed and Kinetic Energy: Example: Learners use the two spinning techniques to vary how much energy they put into the Blendie, observing that a harder, faster flick produces a faster spin with more kinetic energy — and that the spin gradually slows and stops as friction between the dowel and spinning surface removes energy from the system.

MS-PS2-2 – Motion and Stability: Effect of Forces on Motion: Example: Learners design an investigation comparing the angular motion of balanced and unbalanced Blendies, planning a fair test that changes only the symmetry of the build while holding the initial push the same — collecting evidence that net unbalanced forces on an off-center mass change the Blendie’s rotational motion and spin duration.

MS-PS4-2 – Waves and their Applications in Technologies for Information Transfer: Example: Learners explain optical color mixing as a phenomenon of how the human visual system processes light: when a Blendie spins fast enough, reflected red and yellow light from different pieces reaches the eye faster than the brain can resolve separate images, so the brain integrates the signals into a new secondary color (orange) — demonstrating how information carried by waves is interpreted by the observer.

Troubleshooting & Pro Tips

Pieces Come Loose Mid-Spin

The top stopper wasn’t pressed down firmly enough, so the peanuts are loose on the dowel and slide apart when the Blendie spins. Have learners remove the top stopper, press all the parts back together, and push the stopper down hard so the stack is tight.

Hard to Remove Pieces from the Board

Learners pulling straight out will fight the board. Show them how to twist the piece first, then pull. The lobes release much more easily after a quarter-turn.

Blendie Wobbles or Stops Too Fast

This is usually an asymmetry problem — the build is off-balance. Have the learner hold it up and imagine a line down the middle. If the two sides don’t match, guide them to rebuild a symmetrical version and compare the spin quality.

Can’t Make It Spin

The one-hand flick takes practice. If a learner is struggling with fine motor control, switch them to the two-hand technique: position the Blendie on the surface, wrap both hands around the dowel, and quickly move hands in opposite directions until it breaks free and spins.

Colors Don’t Blend — They Just Look Muddy

Check three things: (1) are both colors on the fronts only, not overlapping? (2) is the Blendie spinning fast enough — a slow spin won’t blend? (3) did the learner use two different primary colors, not the same color twice or a primary plus a pre-mixed color?

Stopper Halves Keep Separating

Some stoppers arrive in two halves with a middle square. Before building, have learners remove the middle squares so the stopper is ready to thread onto the dowel cleanly.

Book a quick support session via Calendly
Book here