Verify your email
Hi Johny, to view the full content, please verify your email address by clicking the link sent to youremail@gmail.com
Resend Verification Email
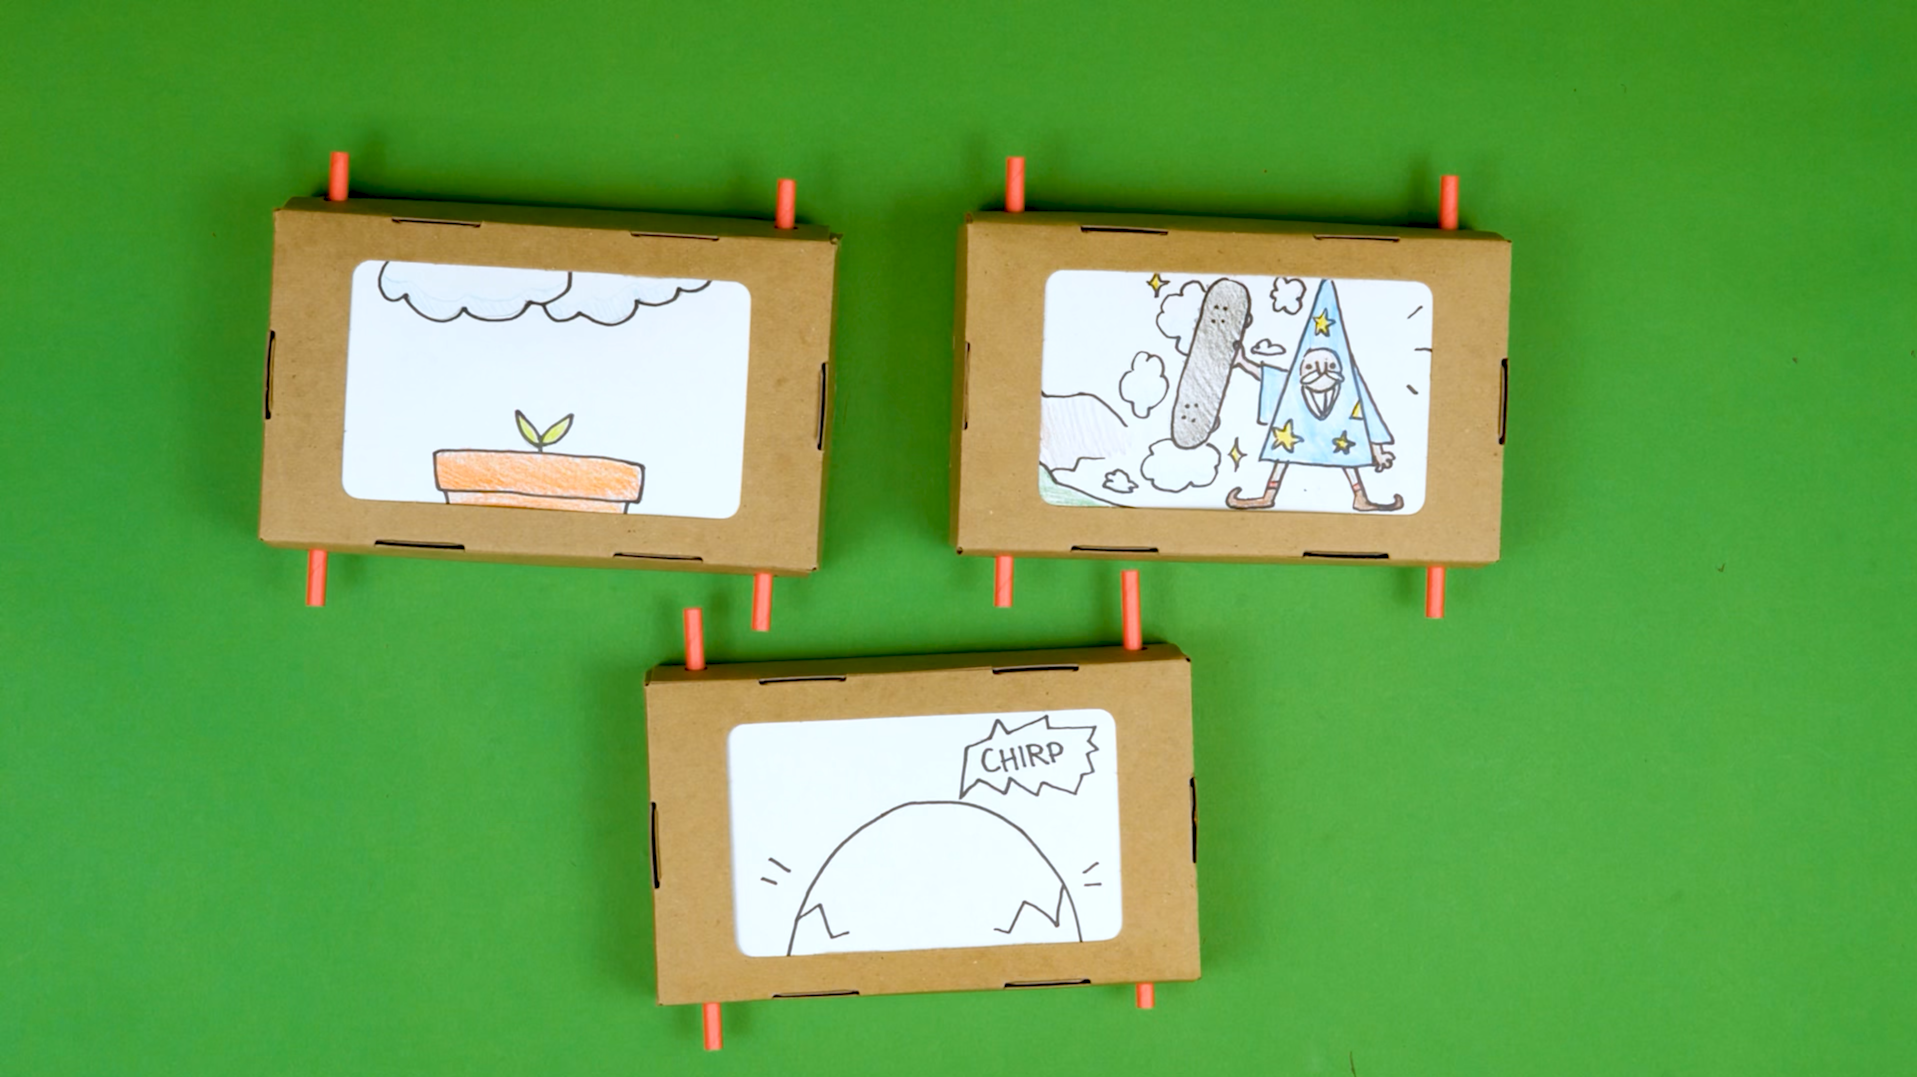
Tell an illustrated story with a folding cardboard screen machine! Learners assemble a die-cut frame, wind a paper scroll around two straws, install the scroll in the frame, then plan and illustrate a story that rolls across the screen like a movie, a theater stage, or a phone display. Crankies come from a long visual-storytelling tradition. This Spark merges engineering, visual art, and language arts into one build that every learner finishes with their own unique story to keep.
Get the materials that pair with this educator guide.
Get the materials that pair with this educator guide.
Quick Start gets the main resources in hand. The guide below helps with the decisions that happen before, during, and after students build.
What students build and how the activity works.
Prep questions and pro tips.
Classroom sequence and prompts.
Learning goals and curriculum connections.
Fixes, adaptations, and extensions.
Crankie Contraptions is a storytelling engineering challenge. Each learner receives a die-cut cardboard frame, two paper straws, a set of printed stickers, a folded paper scroll, a visual guide, and a reclosable bag. Working from those parts, they build a simple scrolling screen machine and then design and illustrate a story that plays across it.
The build follows ten steps across three big moves. First, learners fold the frame: popping out the interior, locking the short sides, then snapping the long sides into place so the word 'interior' ends up on the inside. Next, they attach stickers to both ends of the paper scroll, wind a straw onto each end, then carefully install the scroll into the frame and test the two-handed turning technique - always rolling toward the center of the box. Finally, learners plan a story (a sequence like a flower growing from a seed, or a narrative with a beginning, middle, and end), sketch it on a story planning worksheet, transfer it to the scroll, and share their finished crankie with peers.
Scissors for cutting scroll paper and trimming any additional story sheets.
Pencils for sketching story ideas and drafting illustrations on the scroll before committing with color.
Art supplies - markers, colored pencils, or crayons - to finish the story scroll once the pencil sketch is in place.
Question: What do you notice about the different pieces in your kit? How do you think they might work together to tell a story?
Question: How do you think the tabs and slots on the cardboard work together to hold the frame in place?
Question: How can you tell from the outside of the frame that you folded it correctly?
Question: Why do you think the scroll paper has a marked 'sticker spot' instead of being ready to install straight out of the package?
Question: What do you think will happen if you roll both ends of the scroll in the same direction? How is rolling them in opposite directions different?
Question: What will happen if you try to push both straws into the frame at the same time? What makes flexing the frame easier?
Question: If you turn both straws away from the center of the frame, what happens to the scroll? What does that tell you about how the machine works?
Question: Is your story going to be a sequence that shows something changing over time, or a narrative with a character, a setting, and an ending?
Question: How can drawing in pencil first help you when it is time to add color?
Question: Now that your first crankie works, what is one thing you could change to make the next one feel completely different?
RL.K-2.2 – Retell stories, including key details, and demonstrate understanding of their central message: Example: Learners retell the story they illustrated on their crankie scroll by turning the straws and narrating aloud what happens in the beginning, middle, and end - pointing to each scene they drew and naming the main character and what changes by the resolution.
W.K-2.3 – Write narratives in which they recount a well-elaborated event or short sequence of events: Example: Learners plan a short narrative or sequence on the Story Sketch Handout - naming who the main character is, where the story takes place, and what happens first, next, and last - then transfer that planned sequence onto their crankie scroll with pencil before coloring.
RL.3-5.5 – Explain how chapters, scenes, or stanzas provide the overall structure of a story: Example: Learners explain how each panel on their crankie scroll contributes to the structure of the story - identifying which sections are the setup, which show the conflict or change, and which deliver the ending or unexpected twist that resolves the plot.
SL.3-5.5 – Include visual displays in presentations to emphasize main ideas: Example: Learners perform their crankie for a peer or small group, using the hand-cranked illustrated scroll as a visual display while they narrate the story aloud - pacing the scroll so each scene stays on screen long enough for the audience to see the character, the setting, and the key action.
RL.6-8.5 – Analyze how a particular sentence, chapter, scene, or stanza fits into the overall structure of a text and contributes to the development of theme: Example: Learners analyze how the ordering of scenes on the crankie scroll builds meaning - arguing why they placed the conflict in the middle panels and why the final scene delivers the intended theme or unexpected twist, connecting the visual structure of the scroll to narrative craft.
W.6-8.3 – Write narratives to develop real or imagined experiences using effective technique, relevant descriptive details, and well-structured event sequences: Example: Learners develop a multi-panel illustrated narrative for their crankie scroll with a clear character, setting, rising action, and resolution - revising their Story Sketch plan based on peer feedback so each panel contributes a well-chosen detail to the overall sequence.
K.MD.A.1 – Describe measurable attributes of objects, such as length or weight: Example: Learners compare the length of the unrolled paper scroll to the width of the cardboard frame and describe how many scenes they can fit across the 'screen' at one time - using positional language like longer, shorter, and between as they plan where each panel of their story will land.
1-2.OA.A.1 – Use addition and subtraction to solve one- and two-step word problems: Example: Learners count the number of scenes in their story plan and the number of spaces on the scroll, using addition and subtraction to figure out how many more panels they can fit or how many they need to remove so the story fits the length of the paper.
3.MD.B.4 – Generate measurement data by measuring lengths using rulers marked with halves and fourths of an inch: Example: Learners measure the width of the frame's viewing window and the length of their scroll paper, then divide the scroll into equal sections for each panel of their story - generating a measurement plan that ensures every scene is the same size as it scrolls across the screen.
4-5.OA.C.5 – Generate and analyze patterns: Example: Learners observe the inverse pattern of the two straws as they test their crankie - when the receiving straw gains paper, the feeding straw loses the same amount. They describe this as a consistent one-to-one inverse relationship and predict where on the scroll the story will be after a given number of turns.
6-8.RP.A.1 – Understand the concept of a ratio and use ratio language to describe a ratio relationship: Example: Learners describe the ratio of scenes to scroll length in their crankie - if the scroll holds six scenes across its full length, what ratio describes 'three scenes per half of the scroll'? They use this ratio to plan scene spacing before drawing.
7-8.G.A.1 – Solve problems involving scale drawings of geometric figures: Example: Learners treat the Story Sketch Handout as a scale drawing of the final scroll - measuring how each planned panel on the handout will translate to full size on the paper scroll, so characters and settings fit properly inside the frame's viewing window when the finished story plays back.
K-2-ETS1-2 – Engineering Design: Develop a simple sketch, drawing, or physical model to illustrate how the shape of an object helps it function as needed to solve a given problem: Example: Learners sketch their story plan on the Story Sketch Handout before folding the frame, then use their sketch to guide how many scenes will fit across the crankie's viewing window - iterating on their drawing when a panel is too wide or too tall to display cleanly inside the frame.
K-PS2-1 – Motion and Stability: Plan and conduct an investigation to compare the effects of different strengths or different directions of pushes and pulls: Example: Learners investigate what happens when they turn the straws in different directions - rolling toward the center scrolls the story forward, turning away unwinds the paper or pulls the scroll off the straw. They compare the two directions and describe the rule: always turn toward the center.
3-5-ETS1-2 – Engineering Design: Generate and compare multiple possible solutions to a problem based on how well each is likely to meet the criteria and constraints of the problem: Example: Learners compare a horizontal crankie build to a vertical build for a story about a plant growing or a rocket launching, evaluating which orientation better matches the story's direction of motion and which is easier to hand-crank smoothly during a performance.
3-5-ETS1-3 – Engineering Design: Plan and carry out fair tests to identify aspects of a model or prototype that can be improved: Example: Learners test their crankie before adding final illustrations, rolling through the full scroll to identify failure points: a loose sticker attachment, a torn corner, a scroll that binds inside the frame, or a scene that sits too high to be visible. They fix each issue and re-test - the engineering design cycle in miniature.
MS-ETS1-2 – Engineering Design: Evaluate competing design solutions using a systematic process to determine how well they meet the criteria and constraints of the problem: Example: Learners evaluate competing scroll designs - a standard single-length scroll, a printable extended scroll glued into multiple sections, or a vertical crankie - scoring each against criteria like story length, ease of turning, and audience visibility during a performance. They justify the choice with evidence from their test runs.
MS-ETS1-4 – Engineering Design: Develop a model to generate data for iterative testing and modification of a proposed object, tool, or process: Example: Learners use their finished crankie as a model to generate iteration data: timing how long each scene stays on screen, counting scroll wraps per turn, and noting which panels confuse the audience - then redesigning the scene spacing, sticker placement, or scroll length for a second iteration that tells the story more clearly.
The most common build error is finishing the fold with the word 'interior' showing on the outside of the box. If this happens, unfold the frame and refold it so the side marked 'interior' ends up facing in. Build the flip-and-check into your coaching routine for every learner.
If the scroll will not turn, it may have come loose from the straw. Use the extra sticker (or a piece of tape) to firmly reattach the straw and wind it tight. Always roll toward the center of the box - turning away unwinds the scroll or pulls it off the straw entirely.
If a learner has used up both sides of their scroll, pull out the printable scroll sheet. They can cut, connect, and create a new scroll to keep drafting. Coach them to sketch in pencil first so less paper gets wasted.
The cardboard corner can tear when learners flex the frame to install the scroll. Repair it with an extra sticker or a small piece of tape - a torn corner does not stop the crankie from working.
If the fold comes loose because a tab worked out of its slot, ask the learner what they see before offering a fix. Re-seat the tab firmly, press the long-side wings all the way in, and check that every hole is clear before trying again.