Monster Claws

What are Monster Claws?

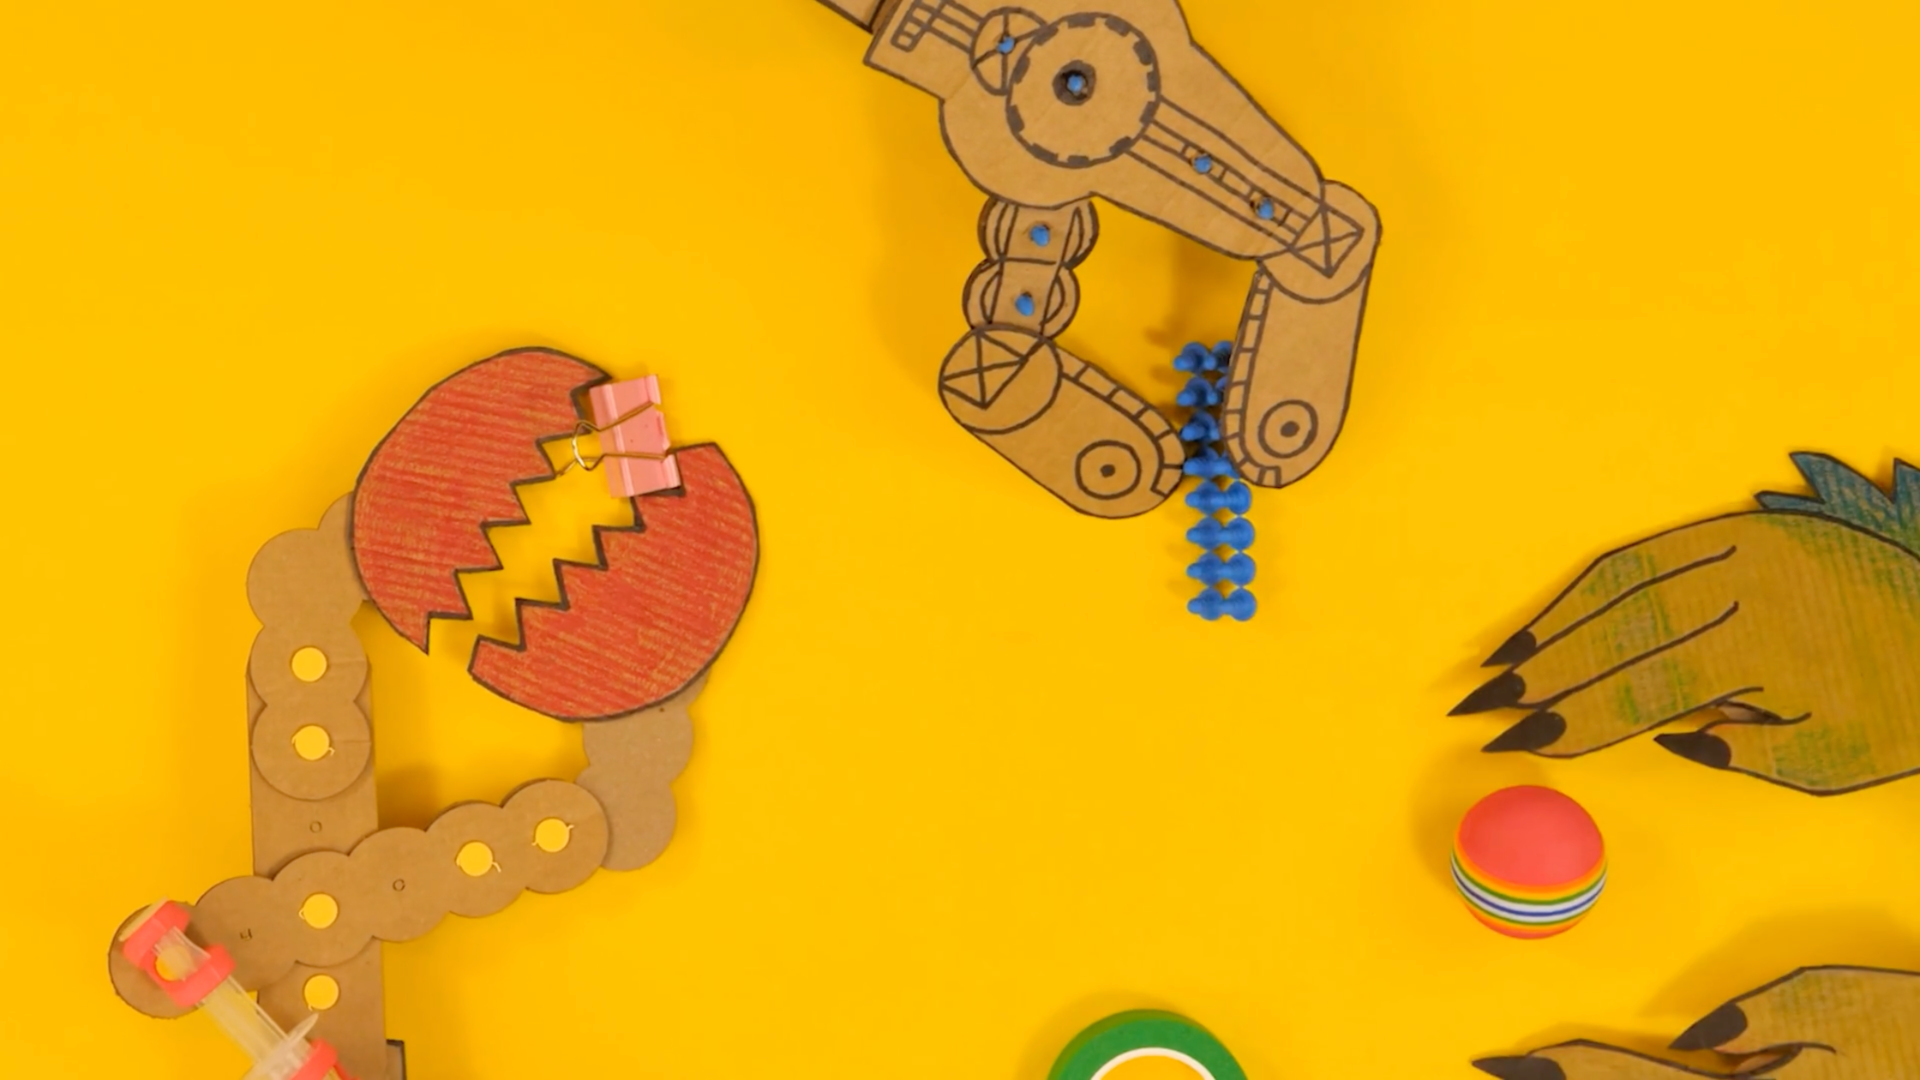
Use pneumatic pistons, cylinders, and a set of rebuildable lever parts to build a working claw that grabs! Learners assemble a multi-component lever from laser-cut cardboard, connect two pistons and cylinders with a flexible tube, and feel how a push or pull on one handle transfers air through the system to open and close the claw. It's an engineering challenge that rewards focus and careful following of a plan — then invites learners to iterate by redesigning grippers, running a pneumatic relay race, or exploring what happens when air is replaced with water.

Time Needed:
20 minutes as a station build, up to 50 minutes for a full classroom lesson with troubleshooting and extensions.
Grade Level:
Grade 3 and up
View our slides!
More resources

Monster Claws Educator Page — the canonical source for the printed visual guide, the slide deck (English), and the copy-and-edit version.

Monster Claws Slide Deck (Copy + Edit) — use this version if you want to adapt the slides for your classroom.

Need more materials?
Click Here
Navigate to
Jump to a section

Overview

Monster Claws is a focused engineering build that introduces learners to pneumatics — the science of moving things with air pressure — while giving them hands-on practice with levers, pivots, and connected mechanical systems. Each learner receives a laser-cut cardboard sheet of six levers, a sheet of foam holder pieces, two pistons and cylinders, a flexible connector tube, colored and gold fasteners, a printed visual guide, and a reclosable bag.

The build follows ten steps: learners explore their materials and identify the triangle, square, and circle fastener cutouts; build the long half of the claw by connecting straight and bumpy-bent levers with colored fasteners; add length by pivoting another straight lever; build the short half from two bumpy levers; connect the two halves at the circle hole to create the basic claw mechanism; prepare two pistons and cylinders with foam holders and gold fasteners (one stays closed, one stays open); then attach the pneumatic system to the claw, connect the tube, and test. The final step invites learners to iterate — improving grippers for a relay race, redesigning parts from scrap cardboard, or carefully experimenting with hydraulics by swapping air for water.

Materials

Each learner recieves
  • A laser-cut cardboard component sheet with six levers — four straight and two bumpy-bent
  • A sheet of foam die-cut holders — three long and one short
  • Two pistons and cylinders
  • A flexible plastic connector tube
  • A set of small colored fasteners (for the cardboard claw build)
  • Four larger gold fasteners (for attaching pneumatics)
  • A printed visual guide
  • A reclosable bag for storage
What you need to provide

Everything needed for the core build is inside the Spark bag. No extra materials are required to complete the basic pneumatic claw.

Optional for extensions: scrap cardboard, scissors, craft supplies (markers, colored paper, stickers, tape) for custom gripper designs; water and food coloring for the hydraulics extension; small objects of varying size and weight for a relay race.

Optional resources
  • Scrap cardboard and scissors — essential for learners who want to redesign custom grippers or replace a damaged lever
  • Craft supplies (markers, colored paper, stickers, masking tape) for making each claw look unique
  • A variety of small objects — paper balls, plastic cups, foam blocks, toys — for relay-race targets of increasing difficulty
  • A small amount of water (plus food coloring) and a spare towel for the hydraulics extension
  • Masking tape for reinforcing a loose fastener or foam holder if reshaping isn't enough
  • A finish line marker or start/end tape for classroom relay races

Key Challenges

  1. Build a multi-component lever system from laser-cut cardboard. Learners match triangle, circle, and square cutouts to connect six levers into two halves of a claw, then hinge the halves together at a circle pivot point — a process-specific design challenge that rewards focus and careful following of the printed guide.
  2. Build a pneumatic system from two pistons and cylinders. Learners pair foam holders with gold fasteners, keep one piston closed and one open, connect them with a flexible tube, and test that a push or pull on one handle moves the other piston through transferred air pressure.
  3. Attach the pneumatic system to the claw and make it grab. Learners press the cylinder into the long lever, fasten the piston to the pivoting square holes, connect the second piston to the short lever, and feel the claw open and close as they pull and push the handle.
  4. Troubleshoot, tune, and iterate. Learners balance an unbalanced pneumatic system, remove mis-placed fasteners without tearing the cardboard, replace damaged levers with scrap-cardboard cutouts, and customize grippers for picking up unique objects in a relay race or exploring hydraulics.

Learner Goals

MUST
  • Match the triangle, circle, and square cutouts on the levers and connect them with colored fasteners to build the two halves of the claw.
  • Connect the short half to the long half using a colored fastener through the second circle hole to create a claw that pivots.
  • Attach foam holders and gold fasteners to two pistons and cylinders — one piston closed, the other open — and connect them with the flexible tube.
  • Attach the pneumatic system to the claw so that pulling the free handle pulls the claw closed and pushing the handle opens the claw.
SHOULD
  • Explain that a pneumatic system moves things with air pressure, and describe how air travels between the two cylinders through the connecting tube.
  • Identify the piston, cylinder, and tube as the three components of a pneumatic system, and point to the lever, pivot, and multi-component lever in their build.
  • Troubleshoot the three most common failure modes: an unbalanced system (one piston fully in, the other fully out is required), a mis-placed fastener that needs removal, and a damaged lever replaced from scrap cardboard.
  • Tune their claw so it opens and closes fully and reliably.
COULD
  • Redesign the gripper surfaces with craft supplies to pick up objects the basic claw struggles with — round things, soft things, tiny things.
  • Compete in a pneumatic relay race, picking up and passing increasingly challenging objects to teammates without breaking a claw down.
  • Experiment with hydraulics by carefully adding a small amount of colored water to one cylinder (instead of air) and observing how the force transfer changes.
  • Personalize the claw with a character face, a creature theme, or a monster identity — this is a STEAM build, and every claw should look different from the example.

Extension Activities

  • Pneumatic Relay Race. Teams of learners pick up and carry a set of increasingly challenging objects across the room, handing off from one claw to the next. The first team to cross the finish line without a claw breaking down wins. Start with easy targets (paper cups, foam blocks) and scale up to harder ones (tennis balls, small boxes, a pencil standing on end). Matt tip: make the last object the hardest so the final gripper design matters most.
  • Engineering Improvements — Custom Grippers. The basic claw struggles with round, soft, or tiny objects. Invite learners to use scrap cardboard, craft supplies, tape, and glue to redesign the bumpy jaws for specific targets. Can they build a claw that picks up a ping-pong ball? A stuffed animal? A sharpened pencil?
  • Hydraulics Challenge. Carefully remove the piston from ONE cylinder only. Add a small amount of colored water (food coloring makes it easy to see) up to the maximum fill line, then re-insert the piston. Reconnect the tube and operate the claw — the force transfer is stronger and more controlled. Warning: cardboard and water don't mix. Keep water contained to one cylinder and have paper towels ready.
  • Make It Yours — Monster Design. The word "Monster" in the name is an invitation. Use craft supplies to add a face, teeth, eyes, a tongue, or a body around the claw mechanism. Every claw should look different from the example — this is a STEAM challenge, not a paint-by-numbers kit.
  • Air Pressure Feel Test. Before connecting the tube, challenge learners to push or pull hard on a single sealed piston (leave the other end of the tube unplugged). Can they feel the air resisting? Pinch the end of the open tube and try again — now the compressed air makes the piston much harder to move. This is the pneumatic system's working principle in miniature.

Step-by-Step Guide

Pre-Activity Questions
3rd - 5th Grade
  1. When you push air into a straw and hold your finger over the other end, what happens? Where does the air go?
  2. Have you ever used something that moves with air pressure — like a bike pump, a water gun, or a pneumatic door? What did you notice?
  3. What do you think the word "pneumatic" means, and why might an engineer build a claw that runs on air?
6th - 8th Grade
  1. What is a pneumatic system, and where would you find one in real life? (Think about construction equipment, dental chairs, or factory robot arms.)
  2. Why do you think engineers use air instead of a direct mechanical link (like a string or gear) for some machines? What are the trade-offs?
  3. If you replaced the air in your pneumatic system with water, would it still work? Would it feel different? Why?
Pro Tips
  • Set the focus expectation up front. From the Monster Claws slide deck: "This project is complicated. It requires focus." Say it out loud before you start. Learners who know a build is deliberately demanding settle in differently than learners who think it'll be a quick craft.
  • Teach the shape-match master rule before any fastening. Triangles to triangles, circles to circles, squares to squares. If you teach this one rule early, 90% of the "I think I put the wrong one in" moments disappear before they happen.
  • Personify the fastener. Many learners struggle with fasteners at first. Have them hold their arms out in front with hands together, then slowly open wide to either side — that's what the fastener arms do on the back of the cardboard. You can also project the "How to Use a Brad" visual aid from the Core Build Guide.
  • Hold both fastener arms together when pushing through foam. The foam holder slits are narrow — if one arm goes in and the other doesn't, the whole thing jams. Pinch both arms together before pressing through.
  • Never separate the second piston from its cylinder. When it's time to prepare the open cylinder, learners will instinctively pull the piston all the way out — and some will pull it apart into two pieces. It's much harder to reassemble than it looks. Keep them together, just fully extended.
  • The "one fully in, one fully out" rule is what makes the system work. If a learner reports "my claw won't move," this is the first thing to check. One cylinder has to be completely closed (piston pushed in) and the other completely open (piston pulled out) before the tube is connected.
  • Balance a mis-balanced system before declaring it broken. From the Video Script: disconnect the tube, push one piston fully in, pull the other fully out, then reconnect the tube. That's the balance reset. It fixes most "claw only opens a little" problems.
  • Remove mis-placed fasteners without tearing the cardboard. Press the fastener point against the table, then gently press down on the cardboard on either side of the fastener. The fastener pops up and you can lift it out cleanly.
  • Broken lever? Replace it from scrap cardboard. Trace the damaged lever on a piece of scrap, poke through the holes with a pencil to mark them, cut it out, and press it into the build as a replacement. Better than trashing the whole claw.
  • Ask before you fix. When a learner is struggling, ask questions and point out what you see before offering hands-on help. Avoid fixing their project for them unless absolutely necessary — this is a focus challenge, and the satisfaction of making it work is the payoff.
  • It's theirs to keep. Mention this up front. Engagement measurably increases when learners know the claw is going home with them — and it reframes the relay-race extension as "custom gear" instead of a shared activity.
  • Careful with hydraulics — cardboard and water don't mix. If you run the hydraulics extension, only add water to ONE cylinder, only fill to the maximum fill line on the piston, and keep the water away from the cardboard levers. Have paper towels ready.

Step 1: Start the Long Half of the Claw

Question: What do you notice about the different holes on each lever? Why do you think they have different shapes?

  • Unpack the kit and lay out the laser-cut cardboard levers, foam holder sheet, two pistons and cylinders, the flexible tube, and the colored and gold fasteners. Discard the small circle scraps, foam frame, and cardboard frame.
  • Point out the three shape cutouts on the levers: triangles, circles, and squares. Explain the master rule early: triangles always connect to triangles, circles to circles, squares to squares. Follow the printed visual guide and you'll never connect the wrong shapes.
  • Find one bumpy bent lever and locate the two triangular cutouts at the end. Press a small colored fastener through each triangle hole so the fastener arms stick out the back.
  • Take a straight lever and align its triangular cutouts over the bumpy bent lever's triangles. Press the two fasteners through to connect the pieces, then open the fastener arms on the back side to lock them together.
  • Many learners struggle with fasteners at first. Personify the fastener — have learners hold their arms out in front with hands together, then slowly open their arms wide to either side, so they can feel how the fastener arms spread.

Step 2: Add a Pivoting Square Connection

Question: What do you think will happen when we connect these two pieces with just one fastener? How is that different from using two?

  • Take one more straight lever and identify the square hole on one end.
  • Slide this lever under the pieces you just built so one of its square holes overlaps a square hole on the lever above. Keep the bumpy part on the LEFT — orientation matters for the next steps.
  • Press ONE colored fastener through the overlapping square holes and open the arms to secure it. This is the only step where one fastener is used instead of two — it creates a deliberate pivot so the two levers can rotate around that single point.
  • Important: do NOT add a fastener to the second square hole. That hole stays open for a reason — it is where a piston will attach later in the build.
  • Test the pivot: gently swing the two levers and feel how they rotate around the single fastener. This is a working mechanical hinge.

Step 3: Complete the Long Half

Question: How do you know which hole to use next? What clues are you looking at?

  • Take the last remaining straight lever and position it beneath the pieces you've already connected so its two triangular holes line up with the exposed triangular holes.
  • Press a colored fastener through each aligned triangle hole and open the arms to lock it in place.
  • You have now built the long multi-component lever — the longest part of the claw mechanism. Lay it flat and compare yours to the printed guide. The pivoting section from Step 2 should still rotate freely; the triangle connections should be rigid.
  • Set this long half aside for a moment. You'll come back to it after building the short half.
  • Pro tip: if a fastener goes in the wrong hole, press the fastener point down against the table and gently press the cardboard on either side of it. The fastener will pop back up and you can remove it without tearing the cardboard.

Step 4: Build the Short Half

Question: How is this half different from the long half you just built? What will you use it for?

  • Pick up the two remaining bumpy levers — one bumpy bent and one bumpy straight.
  • Lay the bumpy straight lever on top of the bumpy bent lever so the triangular holes on each piece overlap and face the same direction.
  • Press a colored fastener through each of the overlapping triangular holes and open the fastener arms on the back side to secure them.
  • This is the short half — and this is the half that will become the two jaws of your claw. Gently swing the bumpy-bent piece and notice how the "jaws" can open and close once connected.
  • Lay the short half next to the long half. You should have two connected lever assemblies ready for the next step.

Step 5: Connect the Two Halves at the Circle Hole

Question: This step is the most important of the whole build. What do you think makes a circle connection different from a triangle or square connection?

  • Take the short half and lay it on top of the long half. Look carefully for the second circular hole on each piece — this is the one you need, not the first.
  • On the long half, find the circle hole just above the pivoting fastener from Step 2. On the short half, find the circle hole farthest from the bent end.
  • Line up the two circle holes and press a single colored fastener through both. Open the arms on the back to lock the connection.
  • You have just created the basic claw mechanism. Pick it up and gently open and close the two bumpy "jaws" by swinging the long half. Both halves now pivot — the circle-hole connection and the single-fastener square connection from Step 2 work together to let the claw open and close.
  • If the motion feels stuck or off, lay the piece down and double-check that you are using the correct circle hole. It must be the second one, not the first.

Step 6: Prepare the First Piston and Cylinder (Closed)

Question: What are pneumatics? What do you think happens inside a piston and cylinder when you push or pull on the handle?

  • Set the cardboard claw aside for a moment. Pull out the sheet of foam holders and identify the three large holders and one small holder. For this first piston and cylinder, you will use TWO large foam holders.
  • Take one of the gold fasteners and push it through the small slit in the center of a large foam holder. Pro tip: hold the fastener arms together so both arms slide through the slit easily — the arms should stick out the far side.
  • Pinch the foam in half so the fastener head tucks inside and the two round holes on either end line up.
  • Pick up the first cylinder (leave the piston pushed all the way in — this one stays closed). Gently press the cylinder's tip into one of the foam holder rings, then through the second ring so both rings wrap around the cylinder. Go slow and avoid rolling or tearing the foam.
  • Slide the assembled foam holder up to the top of the cylinder. Repeat the whole process with a second large foam holder + gold fastener and slide it up just below the first. Both holders should now sit on the same cylinder with their fasteners pointing outward.

Step 7: Finish the First Cylinder and Start the Second

Question: Why do you think we need foam holders on the cylinder at all? What job do they do?

  • Take a moment to inspect the first cylinder — you should see two foam holders stacked near the top, each with gold fastener arms facing forward. If a holder is loose, gently reposition it so both rings grip the cylinder firmly. Set this closed assembly aside.
  • The foam holders are going to be what attaches each cylinder to the cardboard claw — the fastener arms will push through square holes in the levers, just like the colored fasteners did earlier in the cardboard build.
  • Now pick up the second piston and cylinder. Pro tip: do NOT separate the piston from the cylinder into two pieces — keep them together even when you pull the piston fully open.
  • Take one of the remaining LARGE foam holders, insert a gold fastener through its center slit as before, and wrap it around the body of the second cylinder near the tip. Slide it up to the top of the cylinder.
  • You're setting up the second cylinder to become the open one. Keep the piston fully extended for the next step.

Step 8: Prepare the Second Piston (Open)

Question: What is different about this second piston? Why would one stay closed and the other stay open?

  • Take the small foam holder (the shorter one). Insert a gold fastener through its center slit and pinch it in half so the fastener head sits inside and the holes align.
  • With the second piston still fully pulled out of its cylinder, slide the small foam holder over the handle of the piston — not over the cylinder body. The small holder wraps around the piston handle, while the large holder from Step 7 already wraps around the cylinder.
  • Double check: the cylinder should have a LARGE foam holder on it, and the piston handle should have a SMALL foam holder on it. Both foam holders should have gold fastener arms reaching forward, away from the piston.
  • Leave the piston pulled all the way out — this cylinder is now open. That is critical: when you connect the tube in the next step, one cylinder has to be full of air (closed piston pushed in) and the other cylinder has to be empty (open piston pulled out). If both are closed or both are open, no air can flow and the claw won't work.
  • A few fasteners will be left over. Don't throw them away — you can use them later for repairs or for a custom gripper.

Step 9: Attach Pneumatics and Connect the Tube

Question: How is air going to travel between the two cylinders? What do you think will happen when you push one piston in?

  • Bring back the cardboard claw. You will attach the closed piston and cylinder (from Steps 6 and 7) to the long lever of the claw first.
  • Line up the two gold fastener arms on the closed cylinder with two cutouts on the long lever and press firmly. The fasteners will punch through the cardboard — pull on the cylinder to make sure it is firmly attached.
  • Find the pivoting fastener from Step 2 and locate the cutouts just below it. Swing the levers slightly apart, press the fastener arms on the other foam holder through the top lever, then align and press through the next lever to lock everything in place.
  • Now attach the open piston's small foam holder to the square hole on the end of the short bumpy lever. Angle the claw to open it, then press the fastener arms through the square hole.
  • Finally, push and twist the flexible tube onto the handle of one cylinder until it is firmly attached. Snake the tube over and push and twist the other end onto the second cylinder. Both connections need to be snug or air will leak and the claw won't move.
  • Test it: pull the free handle and watch the claw close. Push the handle and watch it open. If it grabs, you have built a working pneumatic system.

Step 10: Iterate!

Question: Now that your Monster Claw grabs, how could you make it even better? What could it pick up that it can't right now?

  • Every Spark is unique and theirs to keep. This is where Monster Claws stops being a build and starts being a design challenge — invite learners to test, tune, and improve.
  • See Extension Activities for structured challenges: redesigning custom grippers with scrap materials and craft supplies, running a pneumatic relay race in teams, and the hydraulics experiment with colored water.
  • If the claw doesn't open or close all the way, the cylinders are unbalanced — Common Issues has the fix.
  • Encourage learners to make theirs look different from the example. This is a STEAM challenge — mechanical, electrical, visual, and storytelling creativity are all on the table.
Post-Activity Questions
3rd - 5th Grade
  1. What makes your claw open and close? Trace the path of air from the handle, through the tube, to the claw jaws.
  2. Why does one cylinder need to be open while the other is closed? What would happen if both were closed?
  3. What was the trickiest step of the build? What would you tell a friend to watch out for?
6th - 8th Grade
  1. How does energy transfer through your Monster Claws pneumatic system? Describe the chain from your hand on the handle to the claw closing on an object.
  2. What happened when you balanced the system (one piston fully in, one fully out)? What does that tell you about air as a material that takes up space?
  3. If you redesigned the claw with larger cylinders, how would the force and the distance of motion change? What about with a longer tube?
  4. How does the hydraulics version compare to the pneumatic version? What trade-offs do engineers make when they choose one over the other?

Standards & Goals

Common Core ELA Standards

RI.K-2.7 – Use illustrations and words in a text to describe key ideas: Example: Learners refer to the printed visual guide and shape-match illustrations in the Monster Claws kit to identify which cutout on each lever is a triangle, a square, or a circle — using both the pictures and the labels to decide where each fastener goes before they press it through.

SL.K-2.1 – Participate in collaborative conversations: Example: Learners describe to a partner what happens when they pull on one piston handle and watch the claw close on the other side, using new vocabulary like "piston," "cylinder," and "air" to explain how their Monster Claw moves during the test phase of Step 9.

RI.3-5.3 – Explain relationships between concepts in a text: Example: Learners explain the cause-and-effect relationship between pulling a piston handle and the claw closing by tracing how air travels from one cylinder, through the connecting tube, and into the other cylinder — connecting what the printed visual guide shows to the physical pneumatic system they built.

W.3-5.2 – Write informative texts to examine a topic and convey ideas clearly: Example: Learners write or dictate a short "how it works" paragraph for their Monster Claw, identifying the piston, cylinder, and tube and explaining how a push or pull on the handle transfers air through the system to open or close the claw.

RST.6-8.3 – Follow a multistep procedure when carrying out experiments: Example: Learners follow the ten-step Monster Claws build sequence precisely — including the critical rule that one piston has to be fully pushed in and the other fully pulled out before the tube is connected — understanding that reversing the order or skipping the balance step means the pneumatic system won't transfer air correctly.

SL.6-8.1 – Engage in collaborative discussions with diverse partners: Example: Learners debate the trade-offs between pneumatics and hydraulics during the extension activity, using their Monster Claws to compare how force transfers through air versus colored water, and arguing which approach is better for specific real-world applications like dental chairs, construction equipment, or robot grippers.

Common Core Math Standards

K.G.A.2 – Correctly name shapes regardless of orientation or size: Example: Learners identify triangles, squares, and circles on every cardboard lever, applying the shape-match master rule (triangles to triangles, circles to circles, squares to squares) to decide which hole each fastener goes through — a direct application of shape recognition to a working mechanical build.

K.MD.A.2 – Directly compare two objects with a measurable attribute in common: Example: Learners compare the length of the piston handle when it is pushed fully in versus pulled fully out, observing that the two positions are what allow the pneumatic system to store and release air — connecting physical length comparison to the working principle of their claw.

3.MD.B.4 – Generate measurement data by measuring lengths: Example: Learners measure how far the piston handle moves when they push or pull it and compare it to how far the claw jaws open or close, generating data about the one-to-one relationship between handle motion and claw motion in their pneumatic system.

4.OA.C.5 – Generate and analyze patterns: Example: Learners observe the inverse push-pull pattern of the pneumatic system — when they pull one piston out, the claw closes; when they push the piston in, the claw opens — recognizing this as a consistent, repeating inverse relationship and predicting the claw's motion before every push or pull.

6.RP.A.1 – Understand ratio concepts and use ratio reasoning: Example: Learners explore the 1:1 ratio of piston displacement in their Monster Claws — observing that pushing one piston in by a certain distance causes the other piston to extend by roughly the same distance — and discuss how changing cylinder sizes would alter this ratio in a redesigned claw.

7.G.B.6 – Solve real-world problems involving area, volume, and surface area: Example: Learners calculate or estimate the volume of air inside a closed cylinder before and after the piston is pushed in, connecting cylinder volume to the force and range of motion they feel in the claw — then predict how a larger cylinder would change both.

Next Generation Science Standards (NGSS)

K-PS2-1 – Motion and Stability: Forces and Interactions: Example: Learners explore how pushing and pulling on one piston handle causes the claw on the other side to open or close, observing firsthand that invisible forces (air pressure) can change the motion of objects — and feeling the resistance when they pinch the tube to compress the air inside.

K-2-ETS1-2 – Develop a simple sketch, drawing, or physical model: Example: Learners build a working physical model of a pneumatic gripper by following the printed visual guide, matching shape cutouts to fasteners, and assembling levers into a multi-component machine — then test, troubleshoot, and iterate when the first version doesn't grab.

3-PS2-1 – Forces and Interactions: Cause and Effect: Example: Learners investigate how the force of pulling a piston handle causes the claw jaws to close, testing different pull strengths to observe how the claw responds — establishing a clear cause-and-effect relationship between applied force, air pressure transfer through the tube, and the opening/closing motion of the claw.

3-5-ETS1-3 – Plan and carry out fair tests to identify failure points: Example: Learners systematically troubleshoot a claw that will not fully open or close by checking one variable at a time — is one piston fully closed and the other fully open? Are both tube connections snug? Are the cardboard fasteners firmly pressed through? — isolating each possible failure point until the system works.

MS-PS3-5 – Energy Transfer: Construct an explanation of energy transfer: Example: Learners explain how energy transfers through their Monster Claws pneumatic system — the mechanical energy of pulling the piston handle converts to pneumatic energy as air is compressed and pushed through the tube, then converts back to mechanical energy on the other side when the second piston extends and pulls the claw jaws closed.

MS-ETS1-2 – Evaluate competing design solutions: Example: Learners compare their Monster Claw's performance when driven by air versus colored water during the hydraulics extension, evaluating which fluid produces stronger, more controlled gripping force — and discussing the trade-offs engineers make between the simplicity and speed of pneumatics and the consistent force of hydraulics in real-world gripper design.

Troubleshooting & Pro Tips

The claw only opens or closes a little bit

The cylinders are unbalanced. Disconnect the tube, push one piston all the way in, pull the other piston all the way out, then reconnect the tube by push-and-twisting both ends firmly. The claw should now have full range of motion when you push or pull the free handle.

The claw doesn't move at all

Check the tube connections — both ends of the tube must be fully pushed and twisted onto the cylinder tips. A loose connection lets air escape. Also check that one piston is pushed in and the other is pulled out (the "one closed, one open" rule). If both are in or both are out, air has nowhere to flow.

A fastener went in the wrong hole

Press the fastener point against the table and gently press down on the cardboard on either side of it. The fastener will pop up and you can lift it out cleanly without tearing the lever. Then re-check the printed guide and place the fastener in the correct hole.

A lever is bent, damaged, or the hole wore out

Trace the damaged lever onto a piece of scrap cardboard, poke through the holes with a pencil to mark their positions, cut the shape out, and press the fasteners into the replacement piece. This lets learners recover from mis-placed fasteners or accidental bends without scrapping the whole build.

The claw moves but is slow or floppy

One or more cardboard connections may be loose. Check that every fastener is firmly pressed through the cardboard and that the arms are fully opened on the back side. Wiggly connections absorb the force that should be moving the claw.

Book a quick support session via Calendly
Book here