Straw Structures

What are Straw Structures?

Explore the geometry hiding in plain sight — connect sturdy paper straws with flexible connectors to transform line segments into shapes and shapes into towering three-dimensional forms. Learners engineer and rebuild structures that reach the ceiling, building perseverance and teamwork along the way.

Time Needed:
15-minute quick build at activity stations. 60 minutes recommended for classroom learning time.
Grade Level:
Designed for learners in Pre-K through 8th grade, but can be used by all grade levels.
Navigate to
Jump to a section

Overview

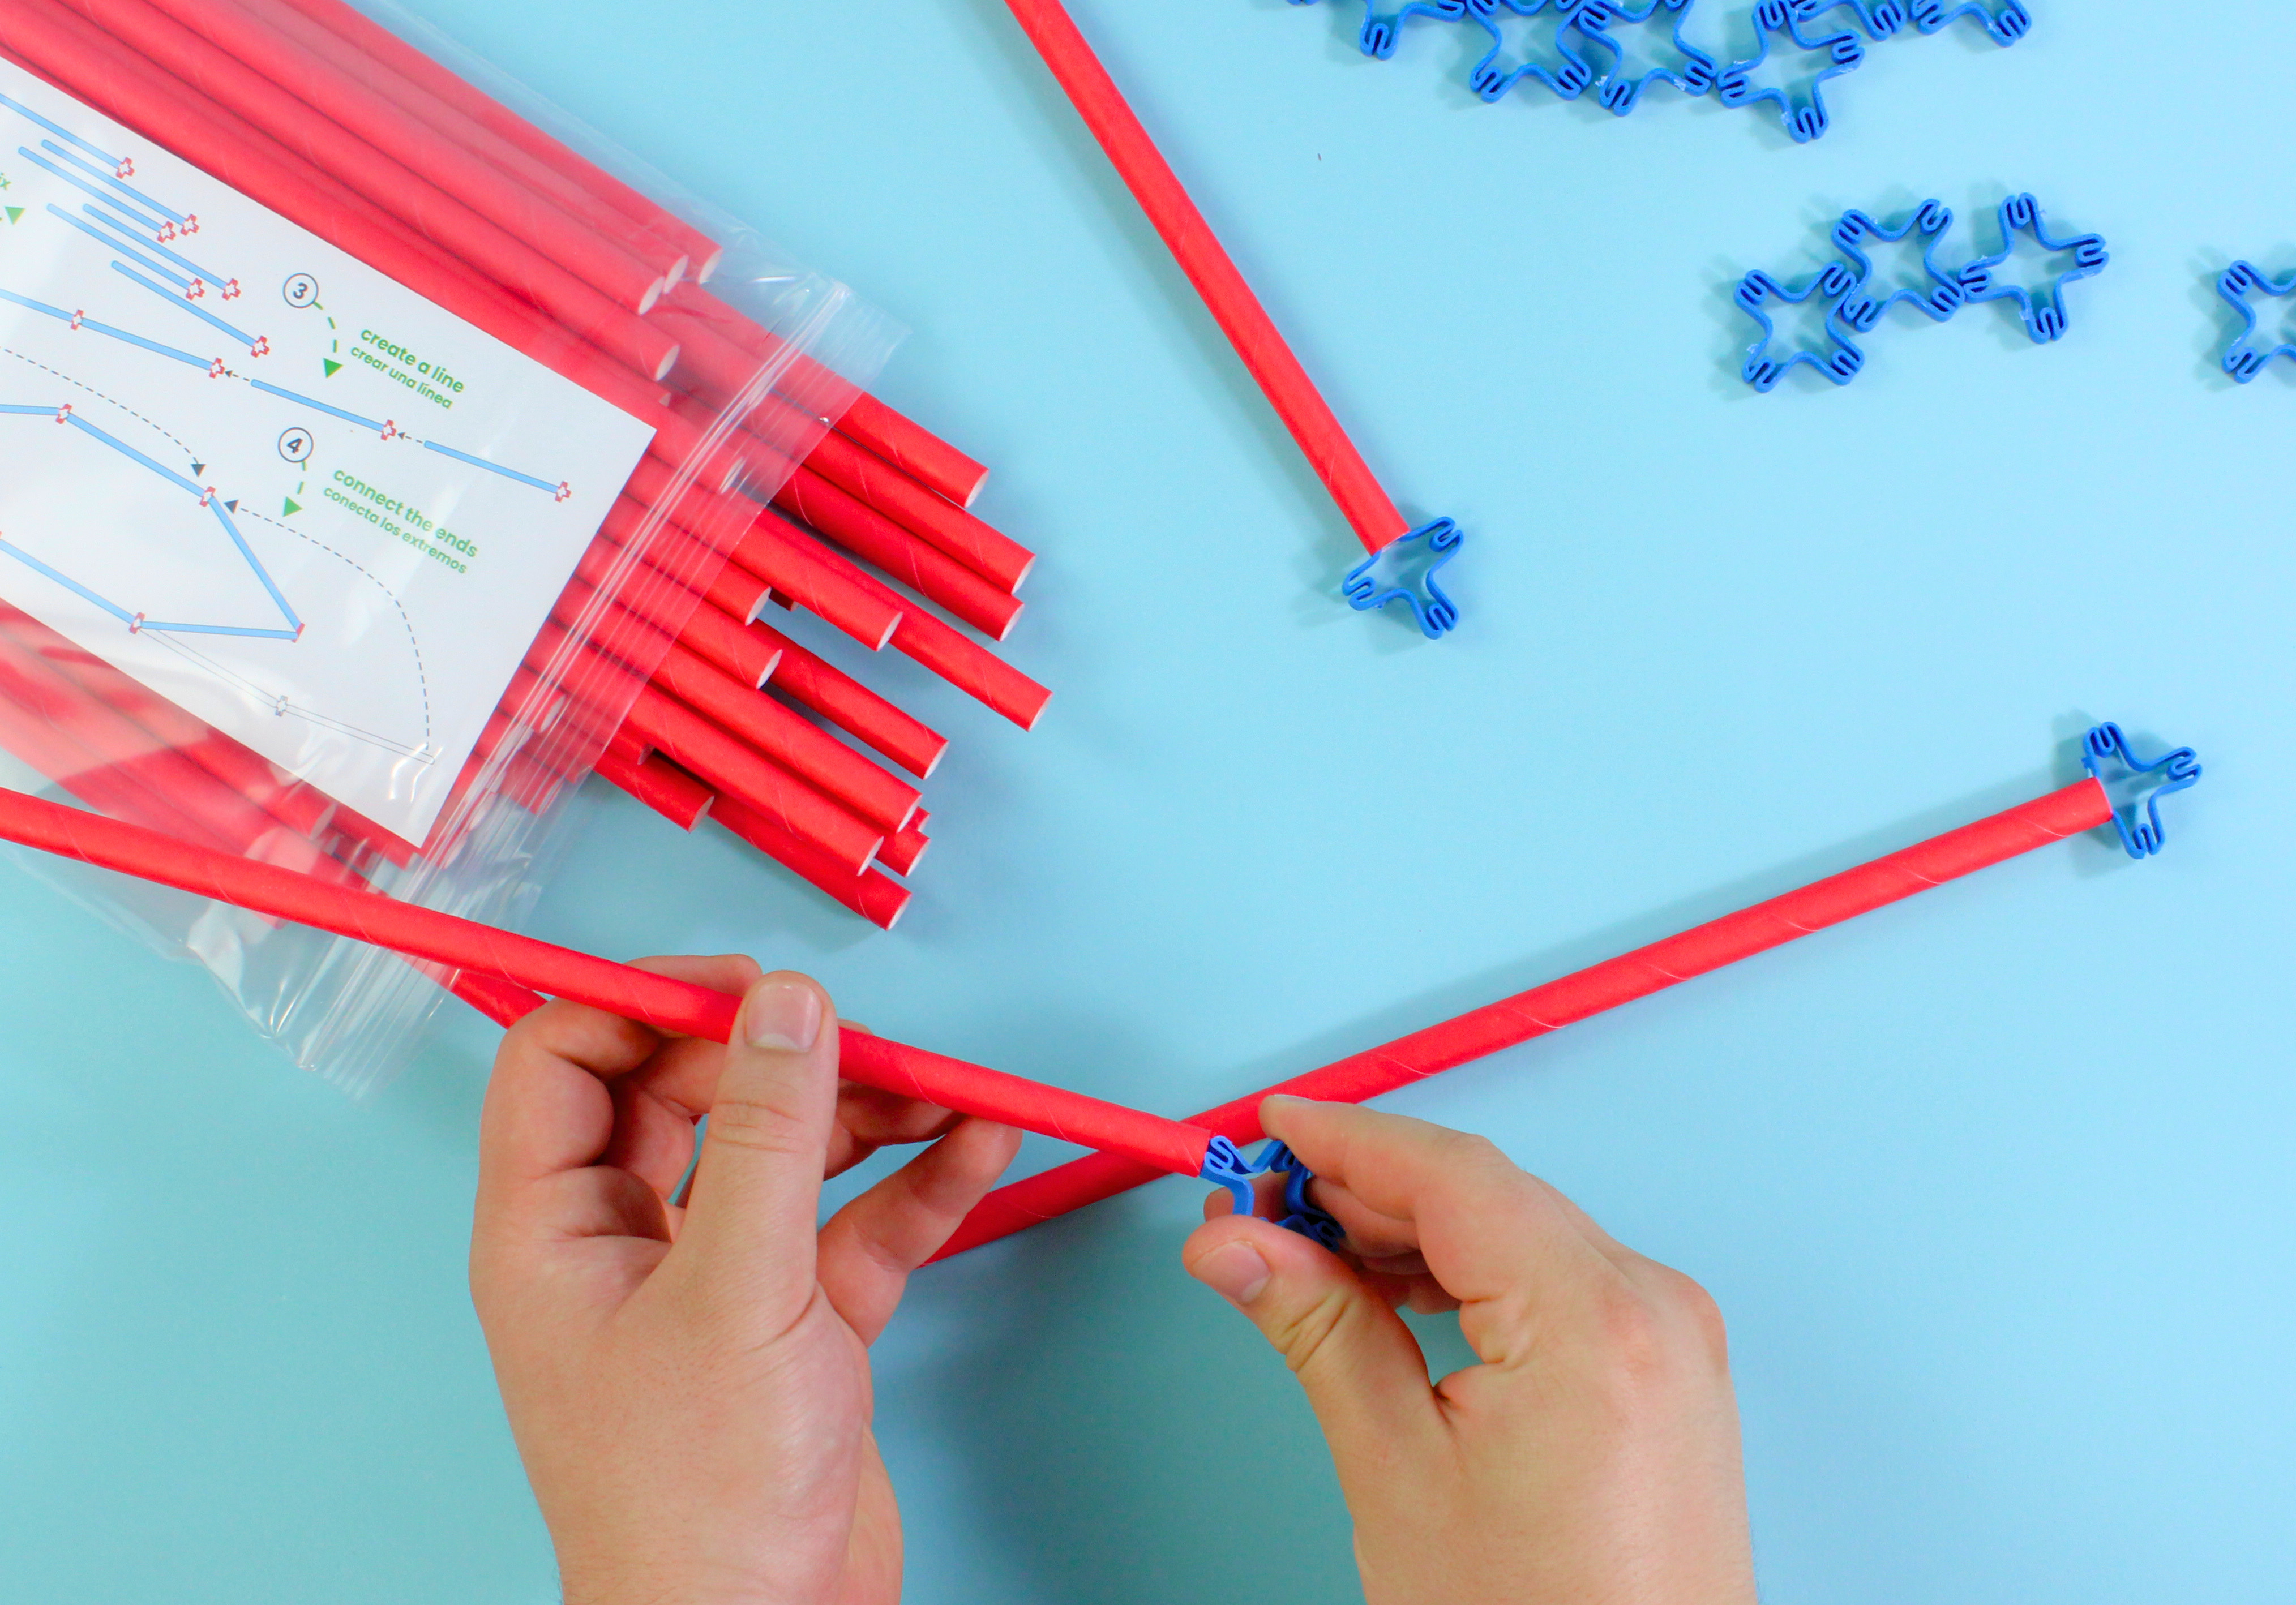
Straw Structures is a hands-on construction kit designed to help learners build understanding of how line segments become two-dimensional shapes and shapes become three-dimensional forms called prisms. Using sturdy jumbo paper straws and flexible connectors, learners create multi-segment bases, build upward to form structures, and take on progressively bigger design challenges — from building a structure as tall as they are to combining with partners to reach the ceiling or create structures big enough to fit inside.

The kit is sturdy enough for teams to build collaboratively and affordable enough for every learner to take home. Through iterative building and rebuilding, learners discover how base width affects stability, how cross pieces reinforce structures, and how geometric choices determine the form they create — whether it's a rectangular prism, a pentagonal prism, or an octagonal prism.

Materials

Each learner recieves
  • 60 sturdy jumbo paper straws (12 inches long, in three colors)
  • A set of special flexible connectors (printed from durable, earth-friendly plastics)
  • A visual guide
  • A reusable reclosable bag
What you need to provide

Scissors for learners to trim or shorten straws if needed — tubes sometimes bend or their ends become smushed.

Ruler or measuring tape for reference, estimation, and comparing structure heights.

Optional resources
  • Extra paper straws for teams combining structures or attempting the tallest builds
  • Painter's tape for marking heights on walls during the "as tall as you" challenge

Key Challenges

  1. Build a structure as tall as you. Learners connect straws and connectors to create a base shape, build upward, and engineer a freestanding structure that matches their own height.
  2. Reach the ceiling without climbing. Teams combine their structures or redesign to build taller, discovering that partnerships and wider bases make greater heights possible.
  3. Create a structure people can fit inside. Learners expand their designs into shorter, wider forms that two or three people can stand inside, then combine with other teams to go even bigger.
  4. Reinforce and stabilize your design. Learners use cross pieces and adjust base width to strengthen their structures, discovering that wider bases are more stable while narrow bases reach higher but topple more easily.

Learner Goals

MUST
  • Connect straws and connectors to build a freestanding three-dimensional structure from a two-dimensional base shape.
  • Identify the difference between a line segment, a shape (2D), and a form (3D).
SHOULD
  • Iterate on their structure to make it taller, wider, or more stable using cross pieces and base adjustments.
  • Collaborate with partners to combine structures and solve design challenges together.
COULD
  • Name the prism their structure creates based on its base shape (rectangular prism, pentagonal prism, hexagonal prism, octagonal prism).
  • Design extension projects such as wearable structures, bridges, or structures based on real buildings.

Extension Activities

  • Wearables: Challenge learners to make clothes and accessories out of straws and connectors — a geometric mask, a hat, or even a full outfit. Use scissors to cut straws into smaller pieces for more detailed and versatile designs.
  • Dream Buildings: Ask learners to build a specific type of building — their dream house, a famous building they've seen in pictures, or an everyday building from their neighborhood. Connect to Social Studies by researching the building first and then engineering a straw version of it.
  • Weird Shape Challenge: Challenge learners to create a structure based on a shape that doesn't have a common name — something entirely new and unfamiliar. Can they describe its properties? How many sides and vertices does it have?
  • Straw Basket: Engineer a basket structure strong enough to hold books, papers, or plushies. Learners will need to think about how to create a solid base and reinforce the sides to handle the weight.
  • Bridge Challenge: Build a bridge that spans a gap between two tables or desks without touching the ground in the middle. Test how much weight it can support before it fails, and redesign to make it stronger.
  • Mega Structure: Combine multiple learners' kits together to build one massive collaborative structure that the whole group can fit inside. Start with smaller team structures, then work together to connect them into a single form.

Step-by-Step Guide

Pre-Activity Questions
Pre-K - Kindergarten
  1. What shapes can you see around the room? Can you find a triangle? A square?
  2. What do you think would happen if we tried to build something really tall? What might make it fall over?
1st - 3rd Grade
  1. What is the difference between a flat shape you can draw on paper and a form you can hold in your hands?
  2. If you wanted to build the tallest tower you could, what shape would you start with at the bottom? Why?
  3. How many sides does a triangle have? A square? A pentagon? A hexagon?
4th - 8th Grade
  1. What is the difference between a two-dimensional shape and a three-dimensional form? Can you give an example of each?
  2. What do you think makes some structures stronger than others? How might the shape of a base affect stability?
  3. What is a prism? How would you describe the relationship between a shape and the prism it creates?
Pro Tips
  • It's NOT a race! Straw Structures rewards patience and planning. Encourage learners to take their time connecting pieces carefully rather than rushing to build tall. Solid connections at the base pay off when the structure grows.
  • Start with multi-segment lines, not corners. Although each connector has four connection points, right angles create a challenge when adding the first vertical piece. Have learners start by building multi-segment lines first — this ensures plenty of attachment points and makes the transition to 3D much easier.
  • Squeeze and push to attach. Connectors need to be fully seated to hold. Teach learners to squeeze the end of the straw slightly and push it firmly into the connector. As structures get larger, connections can loosen — encourage learners to double-check their connections as they go.
  • Three ways to connect. Each connector can attach straws in three different orientations. Show learners all three attachment methods early on, then let them experiment with combinations to discover which configurations create the strongest joints.
  • Create cross sections for stability. Tubes that cross through the center of a form reinforce the structure and make it significantly stronger. Straighten out a pair of connected tubes and insert one through the center of their shared connector to create a cross piece.
  • Wide base, stable structure. The wider the base, the more stable the structure. Narrow bases make taller structures possible but are much less stable. If a team's tower keeps toppling, ask them what they notice about their base compared to their height.
  • Don't throw away bent tubes. Straws sometimes bend or get smushed ends. Learners can use scissors to trim or resize them so they're still useful. Repurposing imperfect materials is real engineering.
  • Lay it down to build it up. When structures need to go taller than learners can reach, teach them to lay the structure on its side, add more tubes horizontally, then carefully stand it back up. No climbing on chairs, furniture, or people.

Step 1: Explore Your Components

Question: What shapes do you think you could build with these straws and connectors?

  • Have learners open their reclosable bag and lay out all components: sturdy jumbo paper straws, flexible connectors, and the visual guide.
  • Point out that the straws come in three colors so learners can keep track of each other's parts when they combine structures later.
  • Show learners how the connectors pull apart easily from their printed sets. Each connector has multiple connection points for attaching straws.
  • Introduce vocabulary: in this project, each straw is a line segment — a line that does not connect to another line, or itself. Connecting line segments creates shapes, and shapes become structures.
  • Let learners know that everything they need is in the bag — no additional materials are required. You may want to have scissors handy for trimming straws and a ruler or measuring tape for estimation.

Step 2: Create Line Segments

Question: How do you think these connectors and straws fit together? What happens when you squeeze the connector?

  • Have learners squeeze and press a connector fully into one end of a straw. The connector should fit snugly inside the tube.
  • Practice this with several straws — each straw with a connector inserted becomes a line segment that is ready to connect to other line segments.
  • Remind learners to press connectors in completely. Loose connections will cause problems as structures get larger.
  • Before building, have learners count out the number of tubes they need to make their chosen base shape. A square needs four, a pentagon needs five, a hexagon needs six.

Step 3: Build a Long Line

Question: Why do you think we start with a long line instead of building a shape one corner at a time?

  • Connect all of the line segments into one continuous line by pressing the open end of each straw onto the connector sticking out of the previous straw.
  • Encourage learners to start with multi-segment lines first. Right angles or corners create a challenge when adding vertical pieces later, so a long line is the best starting point.
  • A four-segment line will become a square. A five-segment line will become a pentagon. A six-segment line is really big — over six feet long — and becomes a hexagon.
  • All of these make great bases for structures. Starting with a long line ensures learners will have plenty of places to attach to when they are ready to build upward.

Step 4: Form a Shape

Question: What happens when you roll your long line into a loop and connect the ends? What shape did you create?

  • Roll the long line into a shape by curving it and connecting the last straw to the first connector, closing the shape end-to-end.
  • Lay the shape flat on the table or floor. A shape is two-dimensional — it has one dimension from top to bottom and a second dimension that goes across.
  • Review shape names with the group: triangle (3 sides), square (4 sides), pentagon (5 sides), hexagon (6 sides), heptagon (7 sides), octagon (8 sides).
  • If you have access to a shareable screen, display the Straw Structures slide deck to show learners the shape examples.
  • Pro tip: It is NOT a race! Take your time forming the shape so connections are solid before building upward.

Step 5: Build Upward

Question: Your shape is flat — two-dimensional. What do you need to add to make it three-dimensional?

  • Lay the base shape flat on the ground. Insert connectors into new straws, then attach these vertical line segments to the upward-facing connector points on the base shape.
  • By adding a vertical tube with a connector, learners will have the start of a three-dimensional form. Structures occupy a third dimension because they are built upward from a base shape.
  • Work around the entire base, adding one vertical segment at each corner. Each vertical segment is approximately 12 inches tall, which makes it easy to estimate the height of the structure.
  • Remind learners: insert connectors into the new straws before adding them to the base shape. This makes attachment much easier.

Step 6: Add Layers

Question: What do you think would happen if you only built upward without adding horizontal connections? How can layers make your structure stronger?

  • Strong structures have layers. Add tubes horizontally to create a strong second layer by connecting the tops of the vertical segments to each other.
  • Work your way around until you have another closed shape to build on. This second layer is the same shape as the base, just one level higher.
  • As you build vertically, layer by layer, a three-dimensional structure will emerge. These forms are called prisms — a square base makes a rectangular prism, a hexagonal base makes a hexagonal prism, and so on.
  • Encourage learners to double-check their connections as they go. Sometimes connections loosen as structures get larger — press connectors in completely.
  • Pro tip: There are three ways to attach a straw to a connector. Create cross pieces by straightening out a pair of connected tubes and inserting one through the center of their shared connector. When bent, the tube locks in one direction, making the structure stronger.

Step 7: Design Challenge — As Tall As You!

Question: Each learner starts with 60 twelve-inch tubes. How many layers tall do you think your structure needs to be to match your height?

  • Challenge each learner to make a structure as tall as they are. Each layer is a little over 12 inches tall, so learners can estimate how many layers they will need.
  • If learners are unsure of their height, have them create a multi-segment line and hold it upright. If it is taller than them, that is how many layers their structure needs to have.
  • The wider the base, the more stable the structure. Narrow bases make taller structures but are much less stable. Encourage learners to explore this tradeoff.
  • Tubes sometimes bend or their ends become smushed. Learners can use scissors to trim or resize them so they can still be useful. Do not throw away bent tubes — repurpose them!

Step 8: Design Challenge — Reach the Ceiling!

Question: Can two or more people work together to build a structure that reaches the ceiling — without standing on chairs, furniture, or people?

  • Ask the group: could they make their structures even taller, as tall as the room? They will soon learn that by laying a structure down, they can connect more tubes and carefully stand it back up.
  • To get the whole group collaborating, challenge them to create shorter structures that sets of two or three learners can fit inside of.
  • When they are ready, expand the challenge: combine multiple teams until you have all your learners inside a single structure.
  • Encourage learners to experiment with different combinations of components to create stronger connections and engineer novel solutions to make their structures sturdy and strong.

Step 9: Iterate!

Question: Now that you know how to build structures from shapes and forms, what else could you create? What would you design differently next time?

  • This is a STEAM challenge — every straw structure should look different. Challenge learners to go beyond prisms and explore entirely new designs.
  • Try wearable structures: geometric masks, hats, or even wearable clothes made from straws and connectors.
  • Try building types: design a dream house, recreate everyday buildings from the neighborhood, or attempt famous buildings and landmarks.
  • Try engineering challenges: build a structure with a weird or unusual shape, construct a basket that can hold objects, or engineer a bridge that spans a gap.
  • When it is time to clean up, learners can disassemble their structures and place tubes and connectors back in the sturdy reclosable bags. Connectors can be reused over and over. Every Spark is unique and theirs to keep!
Post-Activity Questions
Pre-K - Kindergarten
  1. What shape did you use for the bottom of your structure? Can you count the sides?
  2. What happened when you tried to make your structure taller? Did anything wobble or fall?
1st - 3rd Grade
  1. How did you turn a flat shape into a tall structure? What did you add to make it go up?
  2. What made your structure strong or wobbly? Did you find a way to make it stronger?
  3. What kind of prism did your structure make? How do you know?
4th - 8th Grade
  1. How did the shape of your base affect the stability and height of your structure? What trade-offs did you notice between a wide base and a narrow one?
  2. Where did you add cross pieces or reinforcement? How did that change your structure's strength?
  3. If you were going to redesign your structure to be as tall as the room, what would you change about your approach?

Standards & Goals

Common Core ELA Standards

RI.K-2.7 – Use illustrations and words in a text to describe key ideas: Example: Learners refer to the visual guide included in their Straw Structures kit to identify each base shape—triangle, square, pentagon, hexagon—and match the diagram to the number of straws needed, using both the picture and the shape name to plan their build before assembling.

SL.K-2.1 – Participate in collaborative conversations: Example: Learners describe to a partner how they rolled their connected line of straws into a shape, using vocabulary like "line segment," "connector," and "shape" to explain how a flat line of five straws became a pentagon when they attached the last connector back to the first straw.

RI.3-5.3 – Explain relationships between concepts in a text: Example: Learners explain the relationship between their two-dimensional base shape and the three-dimensional form it becomes by describing how adding vertical straws to a flat hexagon and then connecting a second hexagon on top transforms the 2D shape into a hexagonal prism—tracing the concept of shape-to-form transformation from the visual guide to their physical build.

SL.3-5.4 – Report on a topic using appropriate facts and details: Example: Learners present their structure to the class and explain their design decisions—why they chose a hexagonal base over a square one, how they added cross pieces through connector centers for reinforcement, and what they would change to make it taller—using specific structural vocabulary like "prism," "cross piece," and "line segment."

RST.6-8.3 – Follow a multistep procedure when carrying out experiments: Example: Learners follow the sequential Straw Structures build process precisely—first counting out the correct number of straws for their chosen shape, then creating line segments by connecting straws end-to-end, then rolling the line into a closed shape, then building upward with vertical segments—understanding that skipping the base-building step and going straight to vertical construction results in an unstable structure.

SL.6-8.1 – Engage in collaborative discussions with diverse partners: Example: Learners compare the structural stability of wide versus narrow bases during the design challenge, discussing why a hexagonal base with six points of contact supports more vertical height than a triangular base with three—and debating whether adding cross pieces to a narrow base could compensate for fewer ground contact points.

Common Core Math Standards

K.G.A.1 – Describe objects using names of shapes and relative positions: Example: Learners identify and name each base shape they build—triangle, square, pentagon, hexagon—and describe spatial relationships during vertical construction: "the square is on the bottom," "the vertical straws go up from each corner," and "the top square sits above the bottom one."

K.CC.B.5 – Count to answer "how many?": Example: Learners count out the exact number of straws needed for their chosen base shape—four straws for a square, five for a pentagon, six for a hexagon—and then count the vertical straws needed to connect two layers, practicing one-to-one correspondence as they sort straws by color and match each straw to a connector.

3.MD.B.4 – Generate measurement data by measuring lengths: Example: Learners use the known 12-inch length of each straw as a measurement unit to estimate and measure the height of their growing structure—counting vertical segments to calculate total height (three vertical straws = 36 inches = 3 feet) and comparing their tower's height to their own body height during the "build as tall as you" challenge.

3.G.A.1 – Understand that shapes in different categories may share attributes: Example: Learners observe that all their base shapes—squares, pentagons, hexagons—share the attribute of being closed polygons made from straight line segments, and discover that when they build upward from any of these bases with vertical segments and a matching top shape, every resulting form is a prism—connecting shared geometric attributes across different shapes.

6.G.A.1 – Find the area of polygons by composing and decomposing into known shapes: Example: Learners calculate the base area of their hexagonal structure by decomposing the hexagon into six equilateral triangles, using the 12-inch straw length as the side measurement—and compare this base area to a square base's area to reason about why the hexagon provides more ground coverage and greater stability for tall builds.

6.RP.A.1 – Understand ratio concepts and use ratio reasoning: Example: Learners explore the ratio of base perimeter to structure height as they build taller—observing that a structure with a 4-straw square base (48-inch perimeter) becomes unstable at 5 straws tall (60 inches) while a 6-straw hexagonal base (72-inch perimeter) remains stable at the same height, reasoning about the ratio between base width and height that determines structural stability.

Next Generation Science Standards (NGSS)

K-PS2-2 – Motion and Stability: Analyze data to determine if a design solution works as intended: Example: Learners test whether their straw structure stands upright without support after each new layer of straws, observing which base shapes wobble and which stay firm—and noticing that structures with wider bases and more cross pieces resist tipping over when gently pushed, gathering evidence about what makes a structure stable.

K-2-ETS1-2 – Engineering Design: Develop a simple sketch, drawing, or physical model: Example: Learners build a physical model of a prism by first creating a flat base shape, then adding vertical straws, then connecting a matching shape on top—iterating on their design when they realize a triangle base is too narrow and switching to a square or hexagon base to create a structure tall enough to meet the "build as tall as you" challenge.

3-5-ETS1-1 – Define a simple design problem reflecting a need or want that includes criteria for success and constraints: Example: Learners define the constraints of the "reach the ceiling" challenge—they must build tall enough to touch the ceiling using only straws and connectors, cannot stand on chairs, and must work with a partner—identifying that the success criteria (ceiling height) and constraints (no chairs, limited materials) require them to plan their base width, structural reinforcement, and partner coordination strategy before building.

3-5-ETS1-3 – Plan and carry out fair tests to identify failure points: Example: Learners systematically test why their tall structure keeps leaning to one side by checking whether the issue is uneven connector pressure at the base, missing cross pieces on the leaning side, or misaligned vertical straws—isolating one variable at a time by adding a single cross piece and observing whether the lean corrects before trying the next fix.

MS-ETS1-1 – Define the criteria and constraints of a design problem: Example: Learners analyze the "fit people inside" collaborative design challenge by defining quantitative criteria—the structure must be wide enough for a person to stand inside (minimum ~24-inch interior diameter) and tall enough to reach above their head—then calculating how many hexagonal base segments they need and how many partner structures must be combined to achieve the required interior volume.

MS-ETS1-2 – Evaluate competing design solutions using a systematic process: Example: Learners compare the structural performance of triangular-prism, cubic, and hexagonal-prism towers by building all three to the same height and testing which withstands gentle lateral force—evaluating trade-offs between the triangle's rigidity with less interior space, the cube's simplicity with moderate stability, and the hexagon's superior base coverage with higher material cost.

Troubleshooting & Pro Tips

Loose Connections

As structures get larger, connections tend to loosen. Encourage learners to press connectors in completely and squeeze the straw end slightly before inserting. Have them double-check all their connections periodically as they build upward.

Structure Keeps Tipping Over

A narrow base makes a tall structure unstable. Have learners widen their base by using more segments — a six-segment hexagon base (over six feet across) is much more stable than a four-segment square. Ask them to compare their base width to their structure height.

Can't Add Vertical Pieces to Corners

Right angles and corners create a challenge when adding the first vertical straw because connector slots are already occupied. This is why multi-segment lines should come first — they provide plenty of open connection points for building upward.

Bent or Smushed Straws

Straw ends sometimes get bent or smushed during building. Use scissors to trim the damaged end so the straw fits snugly into a connector again. Shortened straws can be repurposed as cross pieces or reinforcement — don't throw them away.

Structure Too Tall to Reach

When a structure grows taller than learners can reach, have them lay it on its side, attach additional tubes and layers horizontally, then carefully stand it back up as a team. Never allow climbing on chairs, furniture, or people.

Book a quick support session via Calendly
Book here