Wind-Up Vehicles

What are Wind-Up Vehicles?

Design a one-of-a-kind rolling vehicle powered by a wind-up spring motor. Learners start with a basic build that teaches them how stored spring energy turns into motion, then deconstruct that build and reinvent it with foam wheels, straws, wedges, collars, and stoppers in any configuration they can imagine. This Spark is an open-ended design challenge — every vehicle should look different from the example, and learners can combine their inventions across the room to create giant rolling machines.

Time Needed:
15 minutes for a quick-build activity station, up to 45 minutes for a full classroom session including iteration.
Grade Level:
Grade 2 and up
View our slides!
More resources
Need more materials?
Click Here
Navigate to
Jump to a section

Overview

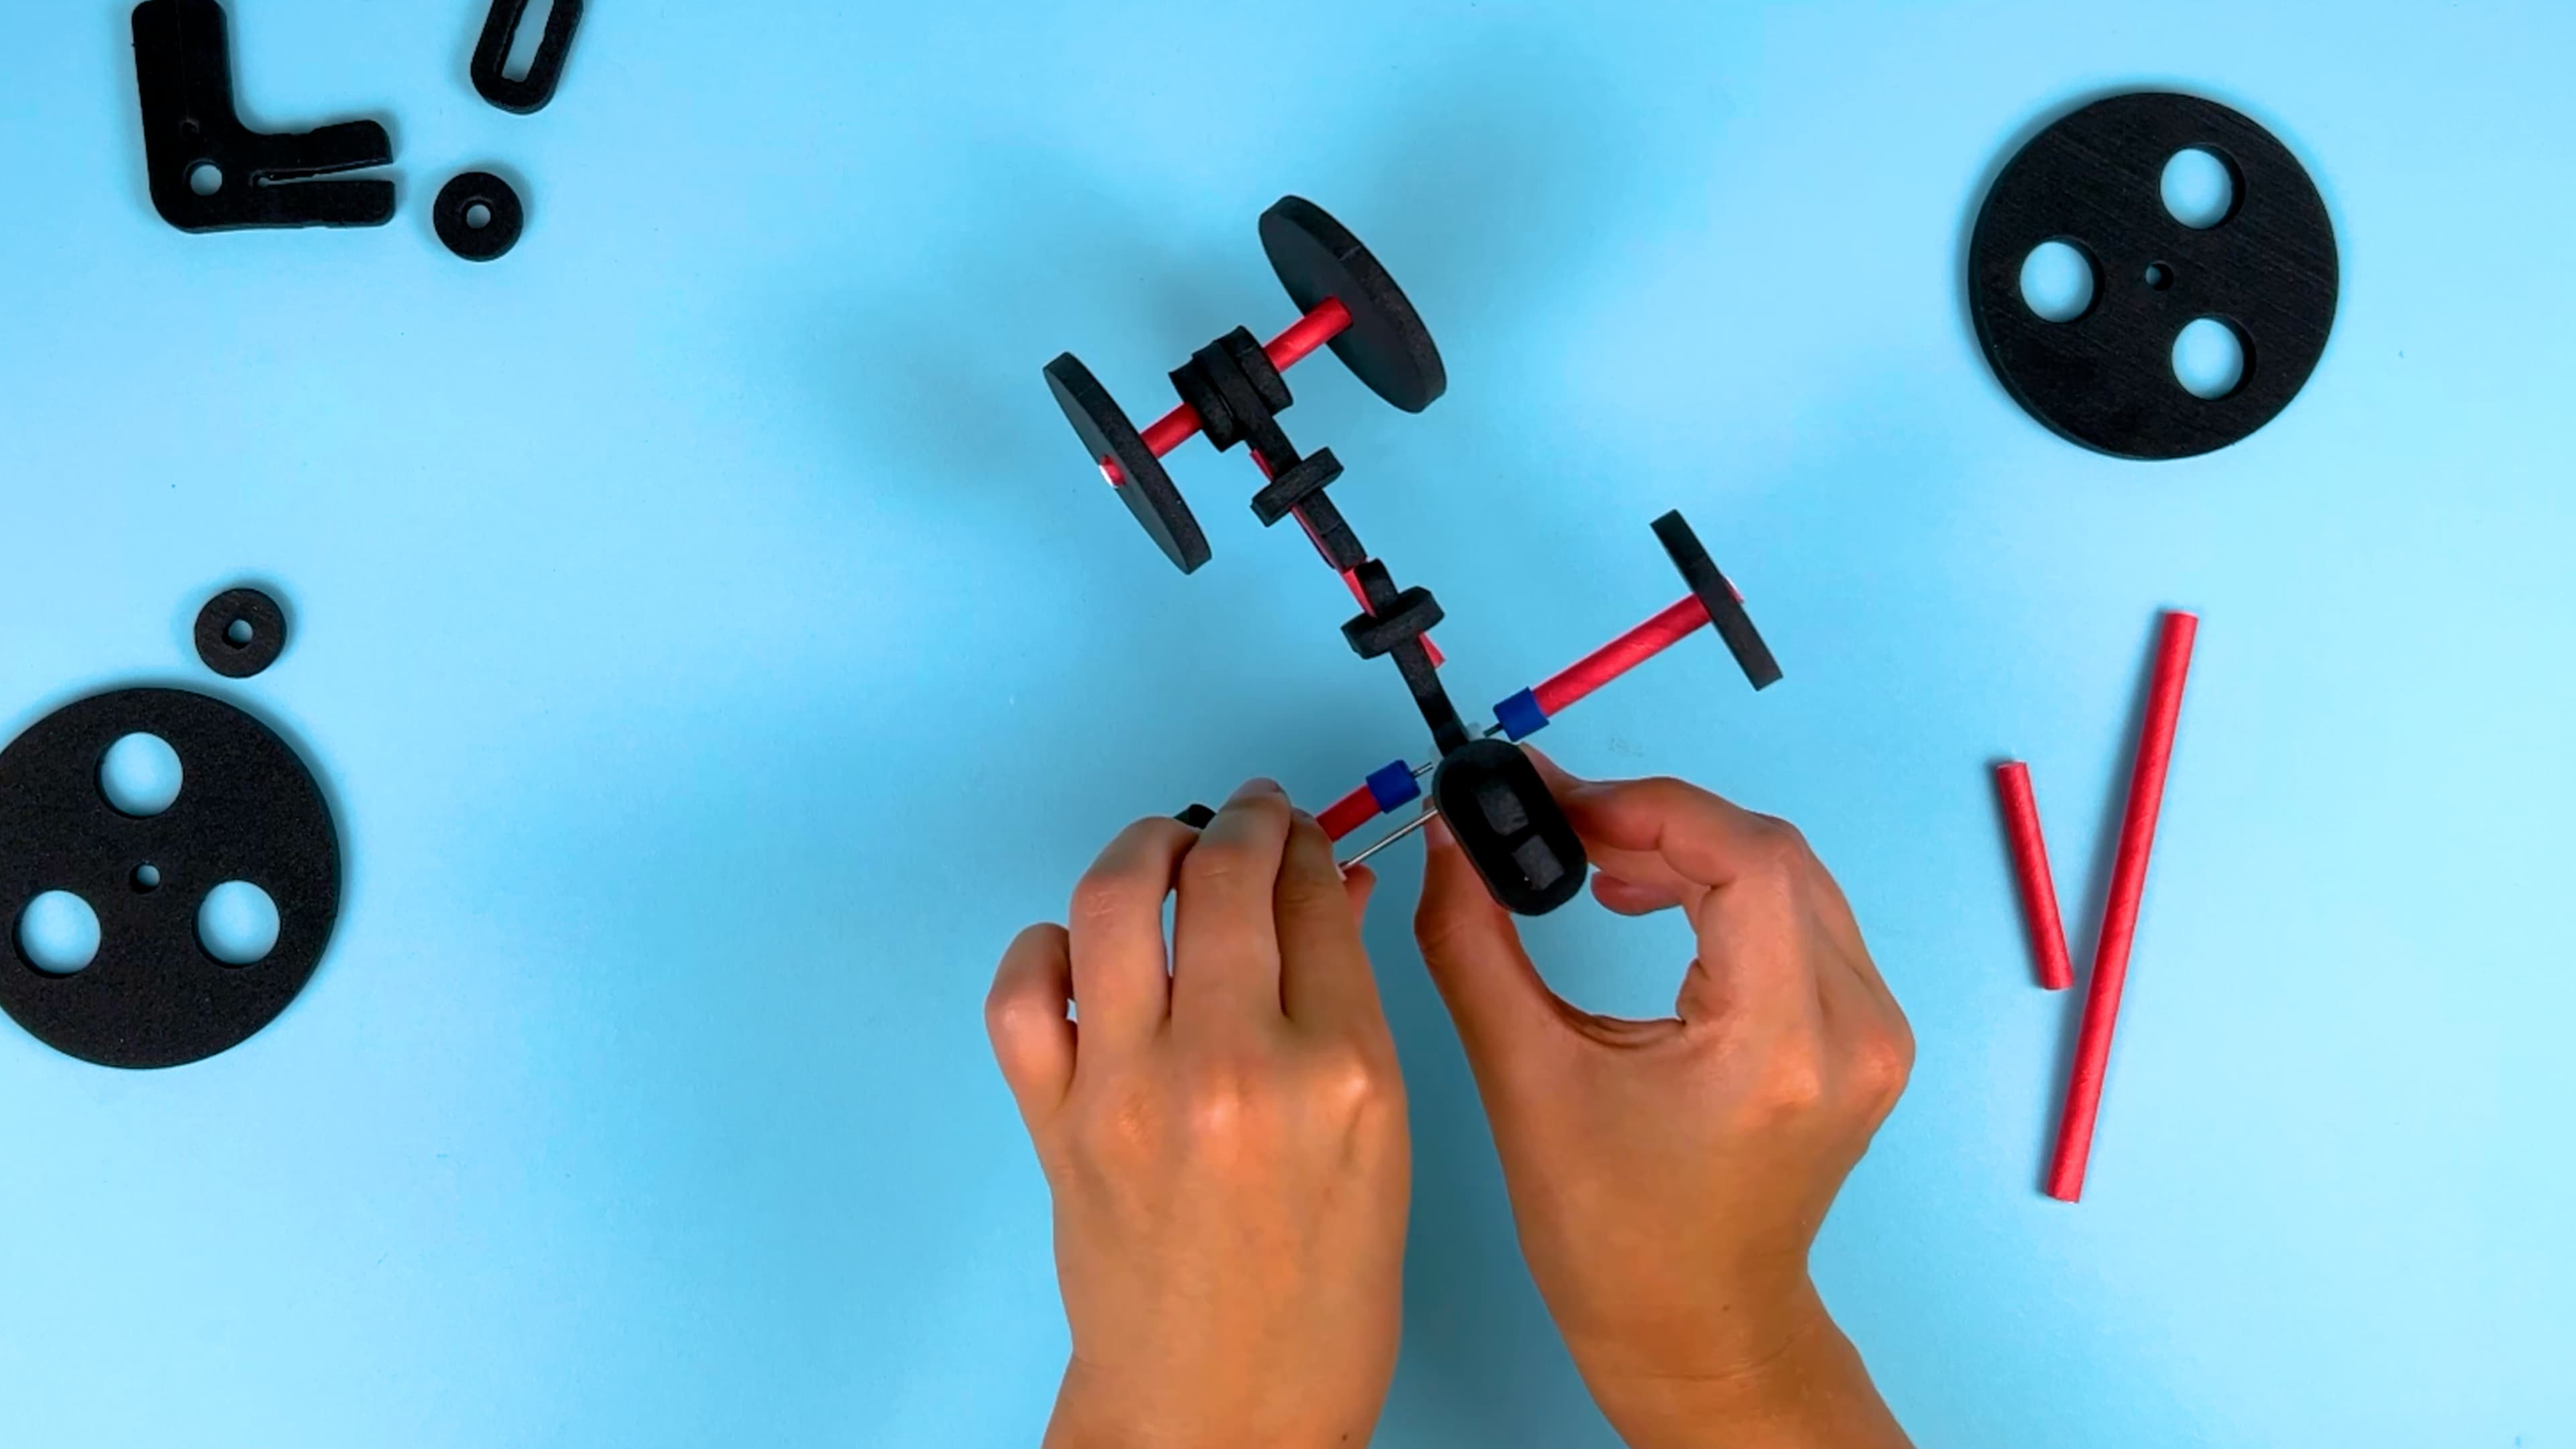
Wind-Up Vehicles is the most open-ended build in the Sparks catalog. Every learner receives a complete kit of reusable parts — two foam component sheets, a wind-up mechanism, six paper straws, and an instruction sheet — and a single challenge: engineer a unique rolling vehicle. Because the wind-up mechanism is a spring-powered motor, learners don't need batteries, wiring, or a power supply — they just wind it up and watch stored energy release as rotation.

The activity has two layers. First, learners follow a shared basic build to orient to the parts and the wind-up mechanism: insert the motor into the motor holder, attach two straw axles, add wheels, secure the back wheels with wedges and collars, and test-drive. The basic build is scaffolding — it's practice. Then the real challenge begins: learners deconstruct their vehicle, grab any combination of collars, stoppers, wedges, wheels, and straws, and invent something totally new. The Spark invites cross-kit collaboration — learners can lock their vehicles together into one giant rolling machine — and encourages risk-taking, because "it's totally okay to try something that doesn't work. That's how you learn and come up with cool new ideas."

Materials

Each learner recieves
  • Foam sheet A — contains the motor holder, wheels, wedges, collars, and stoppers
  • Foam sheet B — additional wheels, wedges, collars, and stoppers
  • A set of six paper straws (for axles)
  • One spring-powered wind-up mechanism
  • A printed instruction sheet
  • A reclosable bag for reusing and storing components
What you need to provide

Scissors for modifying straw axles — trimming excess length, cutting off bent or mushy ends, and creating shorter axles for design experiments.

Optional resources
  • A flat, open floor or tabletop with at least a few feet of clear runway for test drives
  • Masking tape or chalk to mark a start line and race lanes when learners want to race their builds
  • A ramp (a thin board or binder leaned on a book) for learners who want to test how different wheel diameters affect downhill speed
  • A timer or phone stopwatch for measuring travel time across a fixed distance
  • Extra straws from the kit — encourage learners to cut short "experimental" axles without worrying about running out

Key Challenges

  1. Build a working spring-powered drivetrain. Learners insert the wind-up mechanism into the motor holder, attach two straw axles, and add wheels so the stored energy of a tightened spring releases as forward motion.
  2. Master the wedge-and-collar joint. The trickiest part of the build: slide a collar over a wedge, slot a straw between the pinchers, and slide the collar forward to lock it. This joint is how the free-spinning axle attaches to the vehicle body.
  3. Troubleshoot the build with spring-energy reasoning. If the vehicle won't roll, learners check whether the collars are dragging on the ground, whether the straw is seated in the wedge, and whether the axles are too long — isolating one variable at a time.
  4. Reinvent the vehicle. This is an open-ended design challenge. Every finished Wind-Up Vehicle should look different from the example. Learners deconstruct the basic build, swap wheel sizes, add or remove axles, and combine their inventions with classmates' to create giant rolling machines.

Learner Goals

MUST
  • Insert the wind-up motor into the motor holder and attach two straw axles so the spring's stored energy spins the wheels.
  • Use the wedge-and-collar joint to secure a straw axle to the vehicle body.
  • Wind the motor, release it, and observe the vehicle roll.
  • Identify the key parts by name — motor, motor holder, axle, wheel, wedge, collar, stopper — and explain how the spring drives the wheels.
SHOULD
  • Explain that the wind-up mechanism is a spring-powered motor that stores potential energy when tightened and releases it as kinetic energy when let go.
  • Troubleshoot common failure modes — collars rubbing the ground, straws slipping out of the wedges, over-long axles — by changing one thing at a time and re-testing.
  • Reverse the vehicle's direction by flipping the wind-up motor around in the holder.
  • Predict how different wheel diameters will affect the vehicle's speed before test-driving them.
COULD
  • Take on a design challenge: make the smallest possible vehicle, or a single-axle vehicle, or a "most parts" vehicle that uses every piece in the kit.
  • Build a convertible racer with two configurations that each roll forward.
  • Test whether different wheel diameters produce measurable differences in travel distance or speed across a marked course.
  • Combine their finished vehicle with classmates' vehicles to form one giant rolling machine — lock them together with extra straws, collars, and wedges.
  • Design and decorate a theme for their vehicle (race car, monster truck, lunar rover) using scrap paper and markers.

Extension Activities

  • Design Challenge — Use Only Two Wheels. Can you build a Wind-Up Vehicle that actually rolls using only two wheels? What configuration keeps it balanced? (Slide-deck challenge.)
  • Design Challenge — Make It the Smallest. Strip the build down to the minimum parts. What's the smallest Wind-Up Vehicle you can make that still rolls?
  • Design Challenge — Use the Most Parts. The opposite challenge: use every wheel, wedge, collar, stopper, and straw in your kit. How absurd can it get and still move?
  • Convertible Racer. Design a vehicle with two modes that each roll forward — flip it upside down or swap wheels and it keeps driving. (Slide-deck example.)
  • Tiny Speedster. Combine the smallest wheels with a trimmed-short motor holder to make a tiny, fast build. Race it against a taller design.
  • Cross-kit combination challenge. This is the signature Wind-Up Vehicles extension. Have learners lock their vehicles together with extra straws, collars, and wedges — two, three, or every vehicle in the room — to create one giant rolling machine. What happens when all the spring motors release at once? Who drives? Does it still roll straight?
  • Wheel-diameter experiment. Set up a flat track and a ramp. Have learners test their vehicle with all three wheel-pair sizes and measure how far each one travels on a single wind. Chart the results on the board.
  • Race with a fair test. Establish a "same wind count" rule — everyone winds exactly ten clicks — and race on a flat floor. Then discuss whose build traveled farthest and what made the difference.

Step-by-Step Guide

Pre-Activity Questions
K-2 (2nd grade)
  1. What do you think is inside a wind-up toy that makes it go?
  2. What are some things you've seen that store energy and then release it later?
  3. If you could design a vehicle out of these parts, what would it look like?
3-5
  1. What is the difference between a car powered by a battery and a car powered by a wind-up spring? Which do you think goes farther?
  2. How do you think a spring stores energy? Where does the energy go when the spring unwinds?
  3. If you had to predict which wheel size — small, medium, or large — would make a vehicle travel the farthest on one wind, which would you choose, and why?
6-8
  1. How does a spring-powered motor convert potential energy into kinetic energy? Where in the system does each form of energy exist?
  2. What engineering trade-offs might matter when choosing wheel diameter for a wind-up vehicle — speed, distance, stability, torque?
  3. If two vehicles start with the same amount of stored energy but one has much larger wheels, what do you predict about their relative speed and distance?
Pro Tips
  • Save your straw scraps. When learners trim the first axle in Step 5, remind them to keep the cut pieces — one of those scraps becomes the second axle in Step 7. Without it they'll have to cut into a fresh straw.
  • Listen for the clicks. Teach learners the right way to wind the motor: hold the axles still so the wheels can't turn, listen for the click-click-click, and stop as soon as the motor starts to resist. Winding past the resistance point strips the mechanism.
  • The closer the wheel, the steadier the ride. Push wheels down toward the base of the straw (near the motor). Wheels hanging at the outer end wobble and rub — the basic build works best with wheels seated close.
  • PRO TIP from Slide 42: leave a little space. When you slide the collar forward over the wedge in Step 6, don't jam it all the way tight. Leave a sliver of space between the collar and the straw so the axle can still spin smoothly.
  • Flip the motor to reverse direction. If a learner's vehicle rolls backwards and they want it to go forward (or vice-versa), just lift the wind-up mechanism out of the motor holder and re-seat it facing the other way. Same build, reversed direction.
  • Wheel diameter = speed. Bigger diameter wheels cover more ground per spin — they look slow but travel farther. Smaller wheels look fast but travel shorter distances. Invite learners to test their guess with a tape-measure.
  • "Bird beaks" for the younger crowd. The slide deck nickname for the wedge-and-collar pair is "bird beaks" — the shape looks like an open beak. It works well with K-2 learners who freeze on "wedge" and "collar."
  • Warn learners before Step 6. The wedge-and-collar joint is genuinely the hardest part of the build. Announcing "the next step is the trickiest — get ready" gives learners permission to slow down and helps you triage support.
  • Trim mushy straw ends. Paper straws get crushed quickly. If a straw end goes soft or bent, cut it off with scissors and try again on a fresh section — you've got six straws in the kit, so there's plenty of room to experiment.
  • It's theirs to keep. Say this at the start. Every kit goes home with its learner — no communal storage. Ownership transforms engagement.

Step 1: Explore Your Materials

Question: What do you notice about the different pieces in your kit? What do you think each part will do on your vehicle?

  • Have learners open the reclosable bag and spread everything out: two red foam component sheets, six yellow paper straws, one wind-up mechanism, and a printed instruction sheet.
  • Point out that scissors are not in the kit — they are the one extra tool learners will need, for trimming straws and cutting off bent or mushy ends.
  • Before naming anything, ask learners what they think each shape might be for. Let them guess first.
  • Remind learners from the start that this project belongs to them when they are done — watch how their engagement climbs when they know they get to take it home.

Step 2: Pop Out and Name the Parts

Question: How many different shapes do you see? What do you think each one is called?

  • Have learners gently pop every piece out of the two foam sheets. Set the leftover rectangle scrap aside — it won't be needed.
  • Name the parts together: the oval shapes are collars; the small circles that popped out of the two large circles are stoppers; the L-shaped pieces are wedges; the different-sized discs are wheels; and the single important piece — mark it early so learners don't lose it — is the motor holder.
  • With younger learners, use the slide-deck nickname for wedges and collars: "bird beaks." It sticks.
  • Count the wheels together: three pairs in different diameters. Ask learners to predict which size will make the vehicle move fastest — they'll test that prediction later.

Step 3: Insert the Wind-Up Motor

Question: What's inside the wind-up mechanism that makes it work?

  • Pick up the motor holder — the piece you set aside in Step 2. Gently stretch the foam opening and seat the wind-up mechanism inside, oriented so the two output pegs face outward.
  • Introduce the vocabulary: the wind-up mechanism is a spring-powered motor. When you wind it, a metal spring inside tightens and stores potential energy. When you let go, the spring unwinds and releases that energy as rotation — exactly what the vehicle needs to move.
  • Let learners test the motor by winding it once and watching the pegs spin. This is the "click" sound they should listen for — more on that in Step 9.
  • If the fit feels tight, encourage firm but gentle stretching of the motor holder foam. Foam is forgiving; it will return to shape.

Step 4: Attach Your First Axle

Question: Which way do you think the wheels will spin when you wind up the motor?

  • Grab two straws — that's all you need for the first axle.
  • Hold each straw at its base and firmly push it onto one of the motor's output pegs. Push straight — don't twist at an angle or the paper end will crush.
  • Wind the motor a few clicks and release it. The axles should spin together. The direction they rotate is the direction your wheels will roll — note it, because learners will use that observation in Step 9.
  • If a straw crushes or slips off, cut the mushy end with scissors and try again on fresh straw.

Step 5: Add Wheels and Keep Your Straw Scraps

Question: Where on the axle should the wheel go so your vehicle rolls steady? What happens if it's too far out?

  • Pick a pair of wheels — starting with the medium diameter keeps the first build predictable.
  • Hold each straw at its base again and gently press and slide a wheel down to the base. The closer the wheel is to the motor, the more stable the axle will be.
  • Trim off any extra straw beyond the wheel with scissors — and keep the scraps. You'll need one of them for the second axle in Step 7.
  • Give the motor another test wind. If the front wheels spin freely without wobble, you're ready for the trickiest step of the build.

Step 6: Connect a Wedge and Collar

Question: How do you think the wedge and the collar work together to hold the straw in place?

  • This is the trickiest step of the build — slow down and warn learners before they start.
  • Slide a collar (oval piece) onto the long arm of a wedge (L-shaped piece), in front of the motor holder. Don't push it all the way on yet.
  • Insert a straw between the pinchers of the wedge so it's gripped at the bend.
  • Now slide the collar forward over the pinchers to lock the straw in place. You've just built a joint that holds a free-spinning axle against the vehicle body.
  • Repeat the same technique on the second wedge on the other side of the motor.
  • Give the vehicle a test roll on the table. If it moves even a little bit forward, you've got the hardest part behind you.

Step 7: Add the Second Axle

Question: Why do you think the second axle needs stoppers instead of attaching directly to the motor?

  • Grab one of the straw scraps you kept from Step 5 — that's your second axle. (Didn't keep one? Cut a new short piece from an unused straw.)
  • Insert the scrap straw through the hole at the back of the wedge, so it pokes out on both sides.
  • Slide a stopper onto each end of the scrap — push them together just enough to hold the straw, but leave a little room for it to spin freely. These stoppers keep the axle from sliding sideways since the rear isn't driven by the motor.
  • Finally, press one of the small wheels onto each end of the scrap, outside of the stoppers.
  • Your vehicle now has four wheels — two driven by the wind-up motor in front, two free-rolling stoppers at the back.

Step 8: Test Drive!

Question: How far do you think your vehicle will roll on one wind?

  • Place the vehicle on a flat surface with some runway in front of it.
  • Wind the motor — listen for the clicks so you know it's tightening — and then let it go.
  • Watch it roll, and celebrate. Even an imperfect first roll is a working spring-powered drivetrain.
  • If your vehicle moves backwards instead of forward, that's not a failure — it just means the motor is facing the other way. You'll learn how to flip it in Step 9.

Step 9: Troubleshoot and Understand How It Works

Question: What is actually happening inside the wind-up motor when you tighten it?

  • Explain the physics: when you wind the motor, a metal spring inside tightens and stores potential energy. When you let go, the spring unwinds and releases that energy as rotation — kinetic energy — that travels through the axles and spins the wheels.
  • Teach learners the right way to wind: hold the axles still so the wheels can't spin while you wind, listen for clicks, and stop as soon as the motor starts to resist — don't force it past that point.
  • If a vehicle isn't rolling, troubleshoot by changing one thing at a time. Common fixes: check whether the collars are rubbing on the ground (lift the back axle higher), reseat the straw inside the wedges, or trim an over-long axle shorter for more stability.
  • Want it to roll the other way? Just flip the wind-up motor around inside the motor holder — same build, reversed direction.

Step 10: Iterate!

Question: Now that you've built the basic vehicle, what would you change to make it uniquely yours?

  • The basic build was only practice — this is the real Wind-Up Vehicles challenge. Encourage learners to deconstruct their build, grab any combination of parts, and invent something totally new.
  • Every vehicle should look different from the example. Remind learners that trying something that doesn't work is how engineers learn.
  • For structured starting points and the cross-kit combination challenge, see the Extension Activities below.
Post-Activity Questions
K-2 (2nd grade)
  1. What made your vehicle roll? What happened when you wound the motor?
  2. What would you change about your vehicle to make it roll farther next time?
  3. Did you make yours look different from your neighbor's? What's different about it?
3-5
  1. When you wound the motor, what was happening inside the wind-up mechanism? Where was the energy stored?
  2. What was the hardest part of the build, and how did you figure it out?
  3. What did you learn about the relationship between wheel size and how your vehicle moved?
6-8
  1. Trace the energy path in your vehicle from the moment you start winding the motor to the moment the vehicle stops rolling. Where does the energy come from, and where does it go?
  2. If you wanted to design a wind-up vehicle that could travel the farthest on a single wind, what three changes would you test first, and why?
  3. What engineering trade-offs did you encounter? For example, did a choice that made your vehicle faster also make it less stable, or vice versa?

Standards & Goals

Common Core ELA Standards

RI.K-2.7 – Use illustrations and words in a text to describe key ideas: Example: Learners refer to the printed instruction sheet in their Wind-Up Vehicles kit to identify which piece is the motor holder and which are the wedges, collars, stoppers, and wheels — combining the labeled diagram with the physical foam pieces to understand the assembly before starting the build.

SL.K-2.1 – Participate in collaborative conversations: Example: Learners describe their troubleshooting process to a partner during Step 9, using vocabulary like "motor," "axle," and "wedge" to explain why their vehicle rolls backwards or won't roll at all — then listen to their partner's fix and try it on their own build.

RI.3-5.3 – Explain relationships between concepts in a text: Example: Learners explain the cause-and-effect relationship between tightening the wind-up spring and the vehicle rolling forward, tracing how stored potential energy in a wound spring releases as rotation that spins the straw axles and drives the foam wheels across the floor.

W.3-5.2 – Write informative/explanatory texts to examine a topic: Example: Learners write a short build log describing how they modified their vehicle for the wheel-diameter experiment — noting which wheels they tested, how far the vehicle rolled each time, and what they concluded about the relationship between wheel size and travel distance.

RST.6-8.3 – Follow a multistep procedure when carrying out experiments: Example: Learners follow the 10-step Wind-Up Vehicles build sequence precisely, understanding that the order matters — the straws must be seated in the wedge pinchers before the collar slides forward to lock them, and the scraps from Step 5 must be saved because they become the second axle in Step 7.

SL.6-8.1 – Engage in collaborative discussions with diverse partners: Example: Learners negotiate the rules of the cross-kit combination challenge — debating whether vehicles should lock rigidly or flex at the joints, whose motor drives first, and what it means for the giant rolling machine to "work" — building scientific argumentation skills as they test their collaborative build.

Common Core Math Standards

2.MD.A.1 – Measure the length of an object: Example: Learners measure how far their Wind-Up Vehicle travels on a single wind using a ruler or tape along the floor, comparing their result to a classmate's and identifying which build traveled farther — connecting physical length measurement to the spring's energy output.

K.G.A.1 – Describe objects using names of shapes and relative positions: Example: Learners identify the wheel as a circle and the wedge as an L-shape and describe spatial relationships during assembly — "the collar slides in front of the wedge," "the straw goes through the hole," "the stopper sits outside the wheel" — using positional language throughout the build.

3.MD.B.4 – Generate measurement data by measuring lengths: Example: Learners test their vehicle with all three wheel-pair diameters and measure travel distance for each, generating a small data set and displaying it on a line plot — comparing how small, medium, and large wheels translate the same amount of spring energy into different amounts of rolling distance.

4.MD.A.2 – Use the four operations to solve word problems involving distances: Example: Learners calculate the difference in travel distance between their vehicle's small-wheel and large-wheel tests, using subtraction to quantify the improvement and multiplication to predict how far the vehicle would travel over multiple winds at the best-performing wheel size.

6.RP.A.3 – Use ratio and rate reasoning to solve real-world problems: Example: Learners calculate travel distance per wind by dividing the total distance their vehicle rolled by the number of clicks they wound into the spring — comparing rates between their own runs at different wheel sizes and building an intuition for how stored energy converts to motion.

7.SP.B.4 – Use measures of center to draw informal comparative inferences about two populations: Example: Learners compare the average travel distance of small-wheel vs. large-wheel configurations across multiple trials, calculating the mean for each group and using those measures to argue which wheel choice is better for distance vs. speed — using real experimental data from their own builds.

Next Generation Science Standards (NGSS)

K-PS2-1 – Motion and Stability: Forces and Interactions: Example: Learners observe how winding the motor creates a push that rolls the vehicle forward, investigating how the strength of the wind (more clicks vs. fewer clicks) changes the distance the vehicle travels and the speed at which it moves — a direct observation of force-and-motion cause and effect.

K-2-ETS1-2 – Engineering Design: Develop a simple sketch, drawing, or physical model: Example: Learners iterate through multiple vehicle configurations in Step 10, physically modeling each change — swapping wheels, adjusting the wedge position, trimming axle length — and testing whether each modification improves how the vehicle rolls, learning that engineering is a cycle of build-test-change.

3-PS2-1 – Forces and Interactions: Example: Learners investigate how the force released by a tightened spring causes the Wind-Up Vehicle to roll, testing different wind counts and different wheel sizes to observe how the same stored energy produces different motion outcomes depending on the vehicle's design — establishing a clear cause-and-effect relationship between force input and motion output.

3-5-ETS1-3 – Plan and carry out fair tests to identify failure points: Example: Learners systematically troubleshoot a vehicle that won't roll by isolating variables one at a time — checking whether collars are dragging on the ground, whether the straw is seated in the wedge, whether the axle is too long — identifying each failure point, fixing one thing, and re-testing before changing anything else.

MS-PS3-5 – Energy Transfer: Construct an explanation of energy transfer: Example: Learners trace the energy path through their Wind-Up Vehicle: hand-applied mechanical energy converts into elastic potential energy as the spring winds tight; elastic potential energy converts back into rotational kinetic energy when the spring releases; rotational kinetic energy transfers through the axles into the wheels as translational motion, until friction with the floor dissipates it as heat.

MS-ETS1-3 – Analyze data from tests to determine similarities and differences among competing solutions: Example: Learners compare their basic build against their iterated design (or against a classmate's radically different configuration), measuring travel distance, stability, and speed for each and using the quantitative results to decide which design choices matter most when the goal is "farthest per wind" versus "fastest over a fixed distance."

Troubleshooting & Pro Tips

The vehicle won't roll at all

First, check whether the collars on the wedges are dragging on the ground — if they are, the front of the vehicle is sitting too low and the wheels can't turn freely. Adjust the wedge position so the body lifts off the surface. Second, check that the straw is firmly seated inside the wedge pinchers — if the collar slid on before the straw was in place, the joint won't grip. Third, make sure you actually wound the motor far enough to hear the clicks — under-winding is a common overlook.

The vehicle rolls backwards

The wind-up motor is oriented the opposite way — a common quirk, not a failure. Gently lift the wind-up mechanism out of the motor holder, flip it around 180 degrees, and re-seat it. Same build, reversed direction.

Straws are crushing or slipping off the motor pegs

Paper straws are fragile. Cut off the mushy end with scissors and try again on a clean section. Hold the straw at the base — the part closest to the motor peg — and push straight on, don't twist at an angle. You have six straws in the kit, so there's plenty of room to re-cut and retry.

The axle wobbles or the vehicle leans

The wheels are too far out on the straws. Slide them inward toward the motor — the closer the wheel sits to the base, the more stable the axle. If the straw is much longer than it needs to be, trim the excess with scissors.

The motor resists before I've wound it much

That's the spring telling you it's fully tight. Stop winding the instant you feel the resistance — winding past it can damage the mechanism. Release and let the vehicle roll. You don't need a full wind every time; even a half-wind is enough to move the vehicle.

Book a quick support session via Calendly
Book here